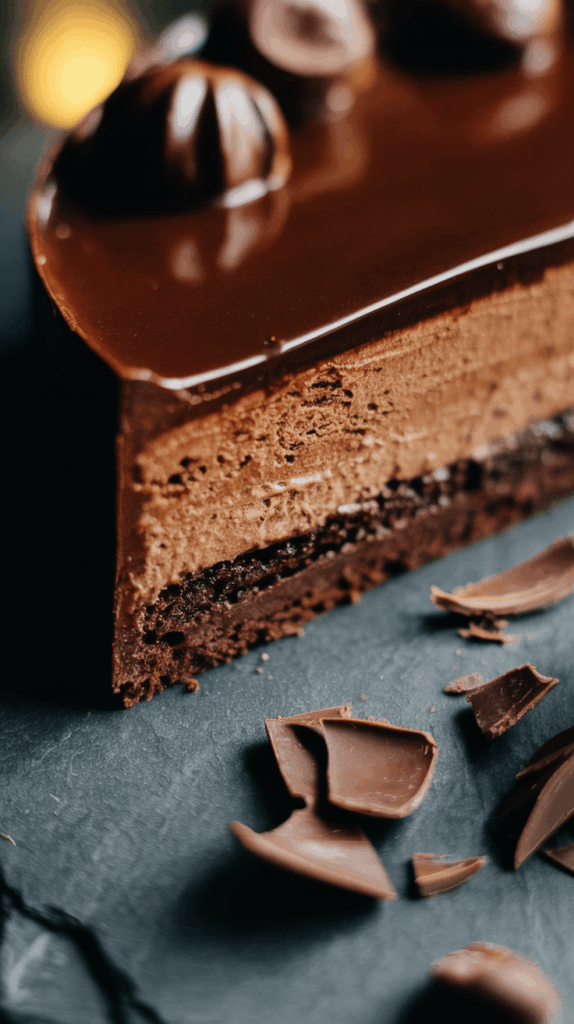
If you’re even slightly obsessed with chocolate, this cake is going to ruin every other dessert for you — in the best way. It’s a triple-layered dream with a soft chocolate cake at the bottom, a cloud of chocolate mousse in the middle, and a glossy ganache on top. Every bite is like a full-on chocolate hug — rich, light, and silky all at once.

This is the kind of dessert that’s perfect for birthdays, dinner parties, or, let’s be honest, an average Tuesday night when you’re just in the mood for something spectacular. I made this last winter when we had guests over, and one slice in, there was total silence around the table — except for the sound of spoons scraping plates.
The Chocolate Cake Base
Before we get to the fancy mousse and ganache, let’s talk about the base — a rich, moist chocolate cake that doesn’t crumble when sliced, yet melts in your mouth.
This one’s my go-to chocolate cake recipe — oil-based (so no waiting for butter to soften), with dark Dutch cocoa and a splash of hot coffee. The batter comes together in one bowl and stays tender thanks to a few things:
-
Cornstarch – Just a spoonful makes the cake texture softer and finer. Think bakery-style.
-
Dutch Cocoa – This is the good stuff — darker, smoother, and gives the cake that rich color and depth of flavor.
-
Sour Cream – Adds body and a bit of tang, which balances all the sweetness.
-
Hot Coffee – Don’t skip this. It’s not about adding coffee flavor; it helps the cocoa “bloom” and intensifies the chocolate like nothing else.
Extra tip: Once the cake cools, I slice off the dome to make a flat base. Then I spoon a quick coffee-cocoa soak over the top. It’s optional, but honestly, it makes a massive difference — the cake turns extra moist and flavorful, like it’s been sitting overnight in the best way possible.
Making That Dreamy Chocolate Mousse
Okay, fair warning — you’ll use more bowls than usual here. But trust me, it’s worth every dish.
I love this mousse because it hits the sweet spot: rich but not heavy, chocolaty but not overwhelming.
Here’s the breakdown:
Step 1 – Melting Chocolate
I use equal parts 70% dark and milk chocolate. That way, you get richness without bitterness, and it doesn’t end up tasting like a bar of baking chocolate. Use good-quality chocolate if you can — it really makes a difference.
After melting it slowly over simmering water, I let it cool a bit before whisking in egg yolks. Yes, raw eggs. No, you won’t taste them. They give the mousse that signature silky finish.
Step 2 – Gelatin and Cream
This part’s what helps the mousse hold its shape. You sprinkle unflavored gelatin over a little water and let it bloom (which is just a fancy way of saying it turns jelly-like). Then you stir that into warm cream — not boiling — just until it steams.
That warm cream gets whisked into the chocolate, bringing everything together smoothly.
Step 3 – The Airy Part
Here’s where the mousse gets its “mousse-ness.”
You whip cream into stiff peaks. Separately, beat egg whites with sugar and cream of tartar into a glossy meringue.
Both go into the chocolate mixture, one after the other, folded in slowly with a spatula. This isn’t a time to rush — gentle folding keeps all the air in, giving you that light, fluffy texture.
Tip: If you overmix or stir too hard, the mousse can get heavy or flat. I usually turn on some music and take my time with this step — it’s kinda relaxing, honestly.
Assembling the Cake
Once the cake is soaked and cooled, and the mousse is ready, it’s time to build this beauty.
I always use a springform pan lined with a tall strip of acetate (you can find it online or at baking stores). It keeps the mousse contained and the sides neat when you unmold the cake.
Just press the acetate between the cake and the pan wall, then pour the mousse over. It should fill right up to the top. The mousse needs at least 4 hours to chill, but overnight is best — that way, it sets evenly, and the flavor deepens.
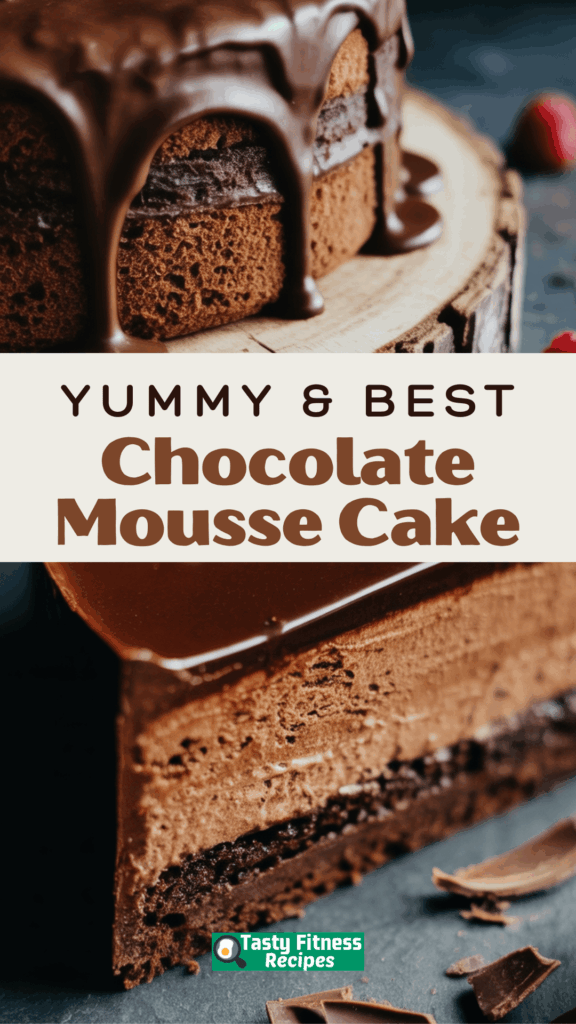
That Final Ganache Drip
This part is my favorite. Once the cake is chilled and set, I remove the springform ring and gently peel off the acetate — it’s SO satisfying seeing those perfect sides.
Then, pour warm cream over chopped dark chocolate and let it sit for 2-3 minutes. Stir it gently until it’s glossy and smooth.
Pour it right in the center of the cake and gently nudge it to the edges with a spatula — the drips will happen naturally. Chill the whole thing again for about 30 minutes so the ganache firms up just enough to slice cleanly.
How to Serve This Cake
Take it out of the fridge about 30 minutes before serving so the mousse softens a bit. I usually serve it as-is — it doesn’t need anything else. But if you’re feeling fancy, a few chocolate curls or a dusting of cocoa powder on top won’t hurt.
Storing Leftovers
This cake keeps really well in the fridge — I store slices in an airtight container and they last up to a week. The texture holds up beautifully and even improves slightly with time. I’ve also frozen individual slices before — just wrap tightly and thaw in the fridge overnight.
FAQs
Can I make this gluten-free?
Absolutely. Swap in a good-quality 1:1 gluten-free flour blend for the cake layer. Everything else is already gluten-free.
Can I skip the coffee?
You won’t taste it, I promise — it just boosts the chocolate flavor. But if you’re not into it, hot water will work too.
Can I use only dark or only milk chocolate?
You can, but I find the balance of both is what makes the mousse just right — not too bitter, not too sweet.
Do I have to use a springform pan?
Yes — trust me on this. Without a removable bottom, the mousse layer is almost impossible to release without ruining the shape.
What if I don’t have acetate?
You can use parchment paper strips, but acetate gives you those super clean edges. Worth getting if you bake layered desserts now and then.
How long does it take to make?
You’ll want to make it the day before so it has time to chill. Actual hands-on time is about an hour, but there are resting and chilling steps in between.
Chocolate Mousse Cake

When you want to pull out all the stops for a celebration, this chocolate mousse cake delivers. A tender, single-layer chocolate cake forms the base, drenched in a coffee-cocoa soak.
Ingredients
For the Chocolate Cake
- 1/2 cup (100g) granulated sugar
- 1/2 cup (105g) dark brown sugar, packed
- 1/2 cup (112g) vegetable or olive oil
- 2 large eggs
- 1 tsp vanilla extract
- 1/2 cup (120g) sour cream
- 1/2 cup (120g) hot coffee
- 3/4 cup (95g) all-purpose flour (or gluten-free blend)
- 2 tbsp cornstarch
- 1/4 cup (25g) Dutch-process cocoa powder
- 1 tsp baking soda
- 1/2 tsp baking powder
- 1/4 tsp kosher salt
Cake Soak
- 1/2 cup (120g) hot coffee
- 1 tbsp Dutch-process cocoa powder
- For the Chocolate Mousse
- 7 oz milk chocolate, chopped
- 7 oz 70% dark chocolate, chopped
- 3 large eggs, separated
- 3 tbsp water
- 1 1/2 tsp unflavored gelatin
- 1/2 tsp cream of tartar
- 1/4 cup (50g) granulated sugar
- 1 3/4 cups heavy cream, divided
Chocolate Ganache
- 6 oz 70% dark chocolate, chopped
- 3/4 cup (180g) heavy cream
Instructions
Make the Cake
- Preheat oven to 350°F (175°C). Lightly grease a 9-inch springform pan. Remove the ring, place parchment over the base, and lock the ring back on, letting the paper stick out.
- In one bowl, whisk together flour, cornstarch, cocoa powder, baking soda, baking powder, and salt.
- In a larger bowl, whisk the sugars with oil until sandy in texture. Add eggs and vanilla, mixing until smooth. Stir in sour cream.
- Add dry ingredients and mix gently. Once mostly combined, pour in hot coffee and whisk until smooth and fluid.
- Pour batter into the pan and bake for 25–30 minutes, or until a toothpick inserted comes out with a few moist crumbs.
- Cool completely, then remove the ring. Level the cake with a serrated knife.
- Reattach the clean ring and line the inside with acetate or parchment (see note below).
Soak the Cake
- Combine hot coffee and cocoa powder.
- Spoon evenly over the surface of the cake to moisten. Set aside while preparing the mousse.
Prepare the Mousse
- Place both chocolates in a heatproof bowl. Set it over a pot of gently simmering water (make sure the bottom doesn’t touch the water). Stir until melted and glossy. Remove from heat and let cool slightly.
- Whisk in egg yolks one at a time. The mixture will thicken—this is expected.
- In a small bowl, combine the water and gelatin. Let it bloom.
- In the same saucepan, warm 3/4 cup cream until hot but not boiling. Stir in bloomed gelatin until fully dissolved.
- Gradually whisk the warm cream mixture into the chocolate base until smooth and pudding-like.
- Whip remaining 1 cup of cream until stiff peaks form. Transfer to a separate bowl and clean the mixer.
- In the clean bowl, whip egg whites with cream of tartar until foamy. Slowly add sugar and beat to soft peaks.
- Gently fold whipped cream into the chocolate mixture, followed by the meringue. Fold until the mousse is completely uniform in color.
- Pour mousse over the soaked cake and refrigerate at least 4 hours, preferably overnight.
Finish with Ganache
- Remove the ring and peel off the acetate.
- Heat cream until just bubbling, then pour over chopped chocolate in a bowl. Let sit 2–3 minutes, then stir until silky.
- Pour ganache over the center of the chilled mousse layer, nudging it outward so it drips down the sides.
- Chill for another 30 minutes to set. Slice and serve.
Notes
- No acetate? Lightly grease the springform ring and line it with tall strips of parchment instead.
- For the cleanest cut, run a sharp knife under hot water before slicing.
Nutrition Information
Yield
10Serving Size
1Amount Per Serving Calories 636Total Fat 44gSaturated Fat 26gTrans Fat 1gUnsaturated Fat 15gCholesterol 178mgSodium 264mgCarbohydrates 48gFiber 5gSugar 29gProtein 11g
TastyFitnessRecipes.com, occasionally offers nutritional information for recipes contained on this site. This information is provided as a courtesy and is an estimate only. This information comes from online calculators. Although tastyfitnessrecipes.com attempts to provide accurate nutritional information, these figures are only estimates.
If you try this cake, let me know how it turns out — it’s one of those desserts that makes people stop mid-bite and go, “Wait… did you make this?”
And yes, you did.
Try other Cake recipes: