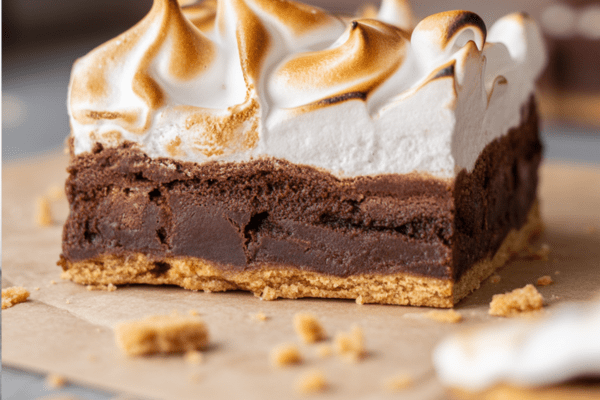
These s’mores brownies are one of those desserts that really make you smile. Imagine the campfire classic — crunchy graham cracker base, rich fudgy brownie middle, and a big fluffy layer of toasted marshmallow on top — all in one square you can eat in your kitchen, no tent required.
Honestly, I started making these when I was missing that classic summer camping flavor but had no intention of pitching a tent in my living room. They’re perfect for parties or just a treat for yourself on a cozy evening at home.
I’ve made these so many times for friends, and the best part is watching them take that first bite. Eyes light up. Mouths full. Silence, except for the “mmm.” That’s how you know you’ve got a winning dessert.
What Makes These Brownies Such a Hit
These aren’t your average brownies. They’re a layered showstopper that people talk about for days.
- They have that unmistakable s’mores taste — without needing a fire pit.
- Perfect for special occasions or when you want to spoil yourself with a seriously indulgent treat.
- The marshmallow layer is so much fun to torch. I like mine super toasty — borderline burnt — but you can do it as golden as you want.
- It’s the kind of dessert that gets people asking for the recipe before they’ve even finished their piece.
Ingredients You’ll Need (and Why I Love Them)
While it seems like there are a lot of parts here, it’s all straightforward stuff. And most ingredients pull double duty.
Graham Crackers
This is the classic base, bringing that unmistakable s’mores crunch. If you can’t get them, digestive biscuits work great too.
Butter
I use unsalted butter and melt it. No need for any fancy prep. It brings the crumbs together and adds richness.
Eggs and Egg Whites
Whole eggs go in the brownie batter to make them fudgy and dense. The whites are for the marshmallow frosting. I always recommend using fresh eggs if you can — it really does make the meringue fluffier.
Dark Chocolate
Here’s the thing: you want real chocolate, with 70% cocoa solids. It’s what gives these brownies their deep, rich flavor without being too sweet. Don’t use chips or candy bars — they just don’t melt the same.
Sugar
Regular granulated sugar is fine. Superfine sugar will dissolve faster in the egg whites if you have it, but I’ve made this plenty of times with regular sugar.
Vanilla
Extract or paste works. Paste adds pretty speckles to the marshmallow, which always gets compliments.
Cream of Tartar
This stabilizes the meringue so you get those gorgeous glossy peaks. No cream of tartar? Lemon juice works in a pinch — just use double the amount.
Building the Graham Cracker Base
If you’re like me, the graham cracker layer is non-negotiable. It’s what takes these from “brownies with marshmallow” to actual s’mores.
I usually blitz the crackers in a food processor, but when I’m feeling low-tech, I pop them in a zip-top bag and go to town with a rolling pin. Very therapeutic.
Once it’s fine crumbs, I pour in melted butter until it’s like wet sand. I really press it into the corners of my pan — this ensures it bakes up nice and firm, so you get that clean layered bite later.
Making the Ultimate Fudgy Brownie Layer
Here’s where the magic happens. These brownies don’t use cocoa powder — it’s all about that melted dark chocolate.
I chop the chocolate into small chunks so it melts quickly and evenly. Microwave in short bursts with the butter until it’s silky smooth.
When I whisk the eggs and sugar together, I aim for a thick, pale texture — this helps get that shiny, crackly top everyone loves. No stand mixer needed — just a sturdy whisk and some elbow grease.
Once that melted chocolate mixture joins in, I stir gently. Then it’s flour and salt, folded in until no dry bits remain. Don’t overmix.
I love pouring this batter over the graham cracker base. It’s this moment you know it’s going to be good.
Baking Tips from My Kitchen
I usually go for the underbaked end of the scale — about 25 minutes — because I want that gooey, melty center that mimics melted campfire chocolate.
Look for these signs they’re ready:
- A dry, shiny top.
- A toothpick that comes out with a bit of chocolatey smudge, not raw batter.
Let them cool completely in the pan. Trust me on this. If you try to lift them while they’re hot, they’ll fall apart. Sometimes I’ll even chill them in the fridge for 20 minutes before slicing for extra clean edges.

The Fluffy Marshmallow Frosting
Here’s the fun part that always feels like magic.
This frosting is basically a Swiss meringue. Don’t let that scare you. You’re just gently heating egg whites, sugar, and cream of tartar over simmering water until the sugar dissolves. I keep stirring so nothing cooks too fast.
You know it’s ready when you rub a bit between your fingers and it’s smooth, no grainy sugar.
Then it’s whipping time. Stand mixer or hand mixer works. I crank it up and let it go until I have glossy, stiff peaks that hold their shape beautifully. Add vanilla at the end for that extra flavor.
How I Like to Finish Them
Option 1: Spread and Torch
I spread the marshmallow frosting thickly over the cooled brownies, swirling with a spoon for texture. Then I take my kitchen torch and toast it all over. I personally go pretty dark because I love that burnt-marshmallow vibe.
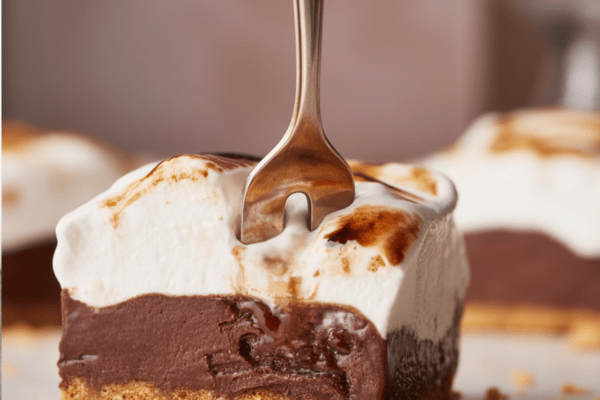
Option 2: Slice and Pipe
For something a little fancier, I’ll cut the brownies first, pipe the frosting on each piece, and then torch them. This is great for parties or when I want each serving to look really polished.
Tip: Always wipe your knife between cuts to keep the layers neat.
Make It an Interactive Dessert
One of my favorite things to do at dinner parties is to let guests decorate their own s’mores brownies.
I’ll cut the brownies and set out bowls of marshmallow frosting, crushed graham crackers, and extra chocolate. Adults love using the torch to toast their own piece (just watch them — people get a little too excited with the flame sometimes).
Can You Cheat with Boxed Mix?
You could, but you’ll lose that ultra-fudgy homemade texture. I’ve tried it both ways and the homemade version wins every single time. If you’re already going to the effort of making the graham base and the marshmallow, it’s worth those extra few minutes to make the brownies from scratch.
Time-Saving Shortcuts I Actually Use
I’ll admit there are nights when I take shortcuts:
- Skip homemade marshmallow: Toss mini marshmallows on top of the brownies for the last 5 minutes of baking so they melt and toast.
- Marshmallow fluff: Store-bought marshmallow fluff works and you can torch it the same way.
- Skip the base: Crumble graham crackers on top of the frosting instead of making a base if you’re in a rush.
Watch Out for These Common Mistakes
- Overbaking: Dry brownies ruin the gooey s’mores vibe. Pull them when they’re still a little soft.
- Slicing too early: Let them cool completely or you’ll have a mess instead of clean layers.
- Egg yolk in whites: This will ruin the marshmallow. I crack my eggs over a separate bowl to separate them carefully.
- Too much flour: Measure carefully. I like using a kitchen scale for precision.
Swaps and Variations I’ve Tried
- No graham crackers? Digestives or even Nilla Wafers work fine.
- No cream of tartar? Lemon juice in double the quantity is a good substitute.
- Add-ins: Chocolate chips, nuts, candies, or mini marshmallows in the batter for fun surprises.
- Extra toppings: Drizzle melted chocolate or scatter more graham cracker crumbs on top of the toasted marshmallow.
Tools I Use Every Time
- 9-inch square pan
- Mixing bowls
- Whisk
- Stand mixer (for the frosting)
- Saucepan
- Heatproof bowl
- Kitchen torch (my absolute favorite part)
S'mores Brownies
Bring a taste of the campfire into your kitchen with these indulgent S’mores Brownies. A buttery biscuit crust lays the foundation, rich fudgy brownies make up the core, and a billowy cloud of toasted marshmallow frosting tops it all off.
Ingredients
Marshmallow Topping
- 4 large egg whites
- 1 cup (200g) granulated sugar
- ½ tsp cream of tartar
- 1 tsp vanilla extract
Brownie Layer
- 3 large eggs
- 1¼ cups (250g) granulated sugar
- 1 tsp vanilla extract
- 10.5 oz (300g) dark chocolate, chopped
- 1½ sticks (170g) unsalted butter
- 1 cup (120g) all-purpose flour
- ½ tsp salt
Crumb Base
- 7 oz (190g) graham cracker or digestive biscuit crumbs (about 11 graham crackers or 13 digestives)
- 1 stick (113g) unsalted butter
Instructions
- Start with the Crumb Base Preheat your oven to 350°F (180°C) and line a 9-inch square baking pan with parchment paper.
- Crush your graham crackers or biscuits into fine crumbs using a food processor or by sealing them in a bag and smashing with a rolling pin. Melt the butter and mix it into the crumbs until the mixture resembles wet sand. Press it evenly into the bottom of your pan and set aside.
- Next, Make the Brownie Batter - Melt the chocolate and butter together in a heatproof bowl using short bursts in the microwave, stirring between each until smooth. Let it cool slightly.
- In a large bowl, whisk the eggs and sugar until the mixture becomes pale and thick. Stir in the vanilla, then slowly mix in the melted chocolate.
- Sift in the flour and salt and gently fold until just combined. Pour the batter over your crumb base and spread it evenly.
- Bake for 25 to 30 minutes if you like your brownies gooey, or up to 35 minutes for a firmer texture. The surface should be set, and a toothpick inserted should come out with a few moist crumbs. Cool completely in the pan—pop them in the fridge to firm up if needed.
- Time for the Marshmallow Frosting - Set up a double boiler: place a heatproof bowl over a pot of simmering water, ensuring the bowl doesn’t touch the water. Add the egg whites, sugar, and cream of tartar. Whisk constantly until the sugar dissolves and the mixture feels smooth when rubbed between your fingers (or reaches 160°F if using a thermometer).
- Remove from the heat, stir in the vanilla, and whisk on high speed using a stand mixer or hand mixer until stiff, glossy peaks form.
- Assemble the Brownies - Once your brownies are fully cooled, spread the marshmallow frosting generously over the top. Create some peaks and swirls—it makes for a stunning finish once torched.
- Use a kitchen torch to toast the frosting until golden and crisp. Slice into squares and serve.
Notes
- For best results, weigh your ingredients—it makes a big difference in the final texture.
- ant shortcuts? Store-bought marshmallow fluff can work in a pinch, but the homemade version really elevates this treat.
- If slicing gets messy, chill the brownies briefly to firm them up.
Nutrition Information
Yield
16Serving Size
1Amount Per Serving Calories 105Total Fat 5gSaturated Fat 3gTrans Fat 0gUnsaturated Fat 2gCholesterol 41mgSodium 133mgCarbohydrates 11gFiber 0gSugar 4gProtein 3g
TastyFitnessRecipes.com, occasionally offers nutritional information for recipes contained on this site. This information is provided as a courtesy and is an estimate only. This information comes from online calculators. Although tastyfitnessrecipes.com attempts to provide accurate nutritional information, these figures are only estimates.
Storing Leftovers (If There Are Any)
These brownies keep well in an airtight container at room temperature for up to 3 days. I don’t refrigerate them — the marshmallow can get weepy.
If you want to prep ahead, you can make the brownies a day or two before and make the marshmallow frosting fresh before serving. The brownie base will hold up fine for about 4 days on its own.
Honestly, every time I make these, I remember why I love baking. They’re nostalgic, over-the-top in the best way, and guaranteed to make people happy.
Try other Brownies recipes: