You know those desserts that vanish at any gathering? This cookies and cream pie is one of them. I make it with just six simple ingredients—cream cheese, heavy cream, and Oreo cookies being the stars.
It’s mostly no-bake and sets up in the fridge, which means you don’t even have to fuss with the oven much. The filling is like the best part of an Oreo cookie turned into a creamy, dreamy slice. Once you taste it, you’ll understand why nobody stops at one bite.

I’ve taken this to potlucks, birthdays, even Thanksgiving dinner as the “non-traditional” pie option—and it never fails to steal attention from the classics. It’s one of those recipes people ask me for before they’ve even finished eating.
How It Feels and Tastes
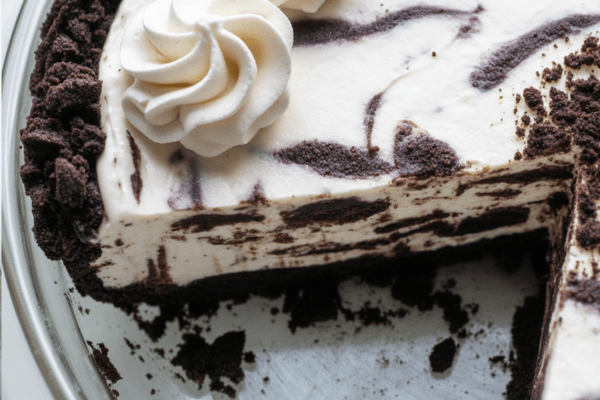
This pie has an extra creamy texture that’s honestly comforting. The crushed Oreos folded into the filling soften as it sits, giving you these pockets of cookie goodness against the buttery, crisp crust.
Flavor-wise, it’s all Oreo love. Even though there’s cream cheese in the filling, it doesn’t scream cheesecake—it’s more of a subtle tang that keeps the pie from being overly sweet or one-note. The cream cheese also helps the pie set firmly enough to slice without being stiff.
When I first made this, I remember thinking it would be too sweet, but the balance surprised me. Now it’s a staple when I want something familiar but a little special.
Why This Is One of My Easiest Desserts
Honestly, I wish all desserts were this straightforward. If you can stir and whip cream, you can make this pie. It’s a great first recipe for new bakers—or for getting kids involved in the kitchen (just handle the oven part for them).
The crust is the only thing that actually bakes, and that’s just 10 minutes in the oven. The rest is simple mixing and chilling. I often make the filling while the crust is cooling so I don’t waste time.
A Quick Look at the Timing
From start to fridge, you’re looking at about 30 minutes of active work. But don’t forget the chilling time—it needs at least 6 hours in the fridge to set properly.
When I know I’ll be busy the next day, I just make it the night before. It’s perfect for planning ahead, and if you’re someone with limited fridge space around the holidays, you can even freeze it instead. Just give it 4 hours in the freezer. It firms up more like an ice cream cake that way.
I’ve made it both ways, and honestly, I can’t pick a favorite. Cold, creamy filling either way, but the freezer version is a real treat in summer.

My Go-To Oreo Crust
Let’s talk about the crust—it’s so easy, you’ll wonder why you ever bought one.
All you need are Oreo cookies and melted butter. I usually blitz 22 whole Oreos (cream and all) in my food processor until they’re fine crumbs. Mix those with melted butter, press it into the pie dish, and bake for 10 minutes.
If you don’t have a food processor, a rolling pin and a zip-top bag work just fine. I’ve done that when traveling or baking at a friend’s house. The only thing to watch is that you want those crumbs pretty fine so the crust holds together well.
I use this same crust for other pies too, like chocolate pudding pie. It’s always a winner.
Step by Step: Making the Filling
This filling is as forgiving as it is delicious. I treat it a lot like a no-bake cheesecake, but it’s even simpler.
First, whip up heavy cream to stiff peaks. I like using unsweetened whipped cream here because it keeps the filling from getting cloying. That whipped cream gives the pie its lovely, soft structure without needing gelatin or cornstarch.
Then, in another bowl, beat softened brick cream cheese with confectioners’ sugar and vanilla extract until it’s smooth and creamy. The cream cheese needs to be at room temperature so it blends nicely. I always set it out on the counter before starting.
After that, gently fold in the whipped cream and chopped Oreo cookies. I usually save a few cookie chunks to sprinkle on top for extra crunch and visual appeal.
Pro tip: Stick with brick-style cream cheese. The spreadable tub stuff doesn’t set right. Learned that one the hard way.
Filling and Finishing Touches
Once your crust is cooled, spread in the filling. I use an offset spatula to get it smooth and even.
Then comes the hardest part: waiting. Cover it and chill in the fridge for at least 6 hours. I usually make it the day before serving, so it’s firm and easy to slice.
You can freeze it too, though the crust firms up more like a cookie ice cream cake. Both versions are crowd-pleasers.
When I want to dress it up, I whip extra cream for the top, and sometimes I’ll drizzle a little hot fudge. It’s decadent without being overcomplicated.
Storing and Serving Tips
I keep this pie in the fridge for up to 4 days. Honestly, it rarely lasts that long in my house.
If you’re making it ahead for a party, just cover it tightly and store it in the back of the fridge where it stays the coldest.
For freezing, I wrap the whole pie dish in plastic wrap and then foil to avoid freezer burn. Defrost in the fridge for a few hours before serving.
I love serving it straight from the fridge in summer, but during cooler months I’ll let it sit at room temperature for 10–15 minutes so the filling softens slightly.
A Few Personal Notes
I’ve brought this pie to holiday dinners next to the classics like pumpkin and pecan, and people are always excited for something a little different.
My niece, who usually refuses anything with cream cheese, devoured two slices the first time I brought it. It’s just one of those desserts that surprises people by being more balanced and less sweet than they expect.
I even keep the ingredients on hand most of the time because you never know when you’ll need an easy, crowd-pleasing treat.
Try other Pie recipes: