Let me tell you something straight up: if you ever catch me staring into the pantry like I’m lost, it’s probably because I’m checking if I’ve got cocoa powder and a pie crust tucked away somewhere. Why? Because this fudge pie is my go-to when I need dessert magic in a hurry. It’s rich, it’s chocolatey, and it takes less effort than making a cup of chai properly—no chopping chocolate, no double boiler, just stir and bake.

Honestly, this is the kind of pie I end up baking when friends drop by unannounced or when I want to impress my nephews with something “fancy” without messing up my whole kitchen.
Why This Pie Is Always a Hit at My Place
It’s pure chocolate comfort. We’re a chocolate-loving bunch over here. Whether it’s cake, brownies, or pudding—I know dessert won’t survive long if it’s cocoa-based. This fudge pie fits that craving perfectly. It’s soft in the middle, has that slight crust on top, and tastes like something much fancier than it is.
Minimal mess, maximum reward. No mixer needed (unless you want to). I usually whisk everything in a big bowl while chatting with someone on speakerphone. That’s how chill this recipe is.
Pantry-friendly. The fact that it uses cocoa powder instead of baking chocolate is a game changer for people like me who never remember to restock baking bars.
It travels well and stores even better. I’ve packed this up in foil and taken it to a housewarming more than once. Still warm, still perfect. It sets beautifully overnight too—ideal for make-ahead desserts.
What You’ll Need From Your Pantry
If you bake even a little, chances are you already have these ingredients on hand. That’s the beauty of this recipe—it’s built for last-minute baking.
-
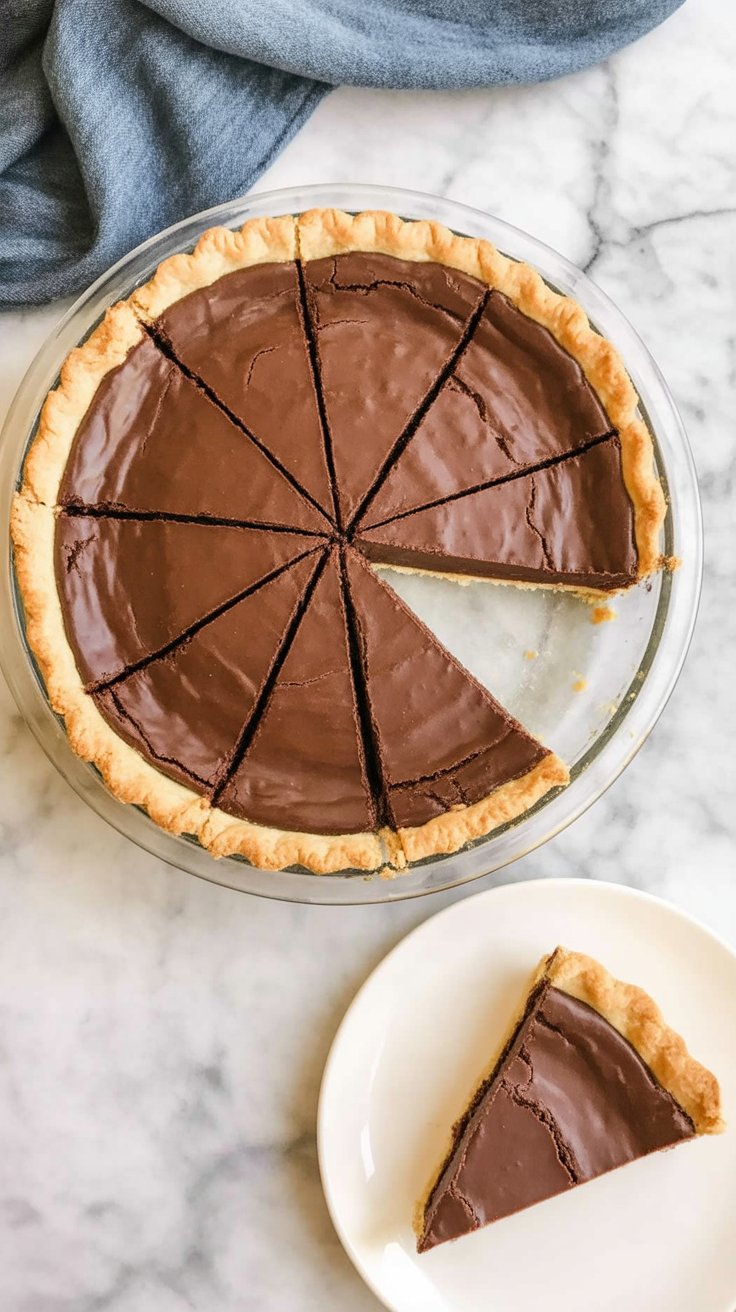
Pie crust: I prefer a refrigerated or homemade crust in a 9-inch pie plate. Frozen ones tend to be smaller and cause spillage. I’ve tried them all (details below), and trust me, stick to the 9-inch standard.
-
Cocoa powder: Hershey’s classic cocoa powder works best for this pie. I’ve tried fancier stuff, but this one gives the texture and flavor that just works.
-
Sugar, eggs, butter, flour, vanilla, salt: You don’t need anything fancy here—just the basics, and you’re good to go.

What Worked and What I’d Skip (I Tested Every Crust!)
I ran this recipe through a few rounds—mainly to test which crusts play nice with this fudgy filling. Here’s what I found:
Frozen Deep-Dish Crust
-
Took longer to bake, cracked on top, and the edges were borderline burnt.
-
Looked good going in, came out… less than ideal.
-
Verdict: Not worth the risk.
Standard Frozen 9-Inch Pie Crust
-
The filling overflowed unless I scooped out about 1¼ cups.
-
The pie still puffed and deflated, but it didn’t crack as much.
-
Verdict: Works in a pinch, but adjust the filling.
Refrigerated or Homemade Crust in a 9-Inch Pie Plate
-
This was the winner—perfect fit for the filling, beautiful set, no puffing drama.
-
Crust held its shape and baked evenly.
-
Verdict: My go-to every single time.
How I Make It (Even My Niece Can Do This!)
This recipe is so foolproof that my 10-year-old niece made it with me last Diwali weekend—flour all over the counter and chocolate smudges on her nose, but the pie still turned out fantastic.
1. Pre-bake the Crust
Pop your crust into a 9-inch pie plate. Line with parchment and fill with pie weights (or dried beans, which I always keep for this). Bake at 375°F for 15–20 minutes, remove the weights, prick the crust, and bake again for another 7–8 minutes. Done.
You can do this step a day ahead if you’re planning for guests.
2. Melt the Butter
Melt ¾ cup of unsalted butter in a big microwave-safe bowl. Let it sit for a few minutes so it’s not piping hot before adding sugar.
3. Whisk in Sugar
Stir in 1½ cups of sugar. It won’t fully dissolve—that’s okay. A little graininess is expected.
4. Add the Rest
Toss in:
-
⅓ cup flour
-
⅓ cup cocoa
-
⅛ tsp salt
-
1½ tsp vanilla
-
3 eggs
Mix it up with a whisk or hand mixer. I usually whisk unless my arms are tired from doing the dishes.
5. Bake It
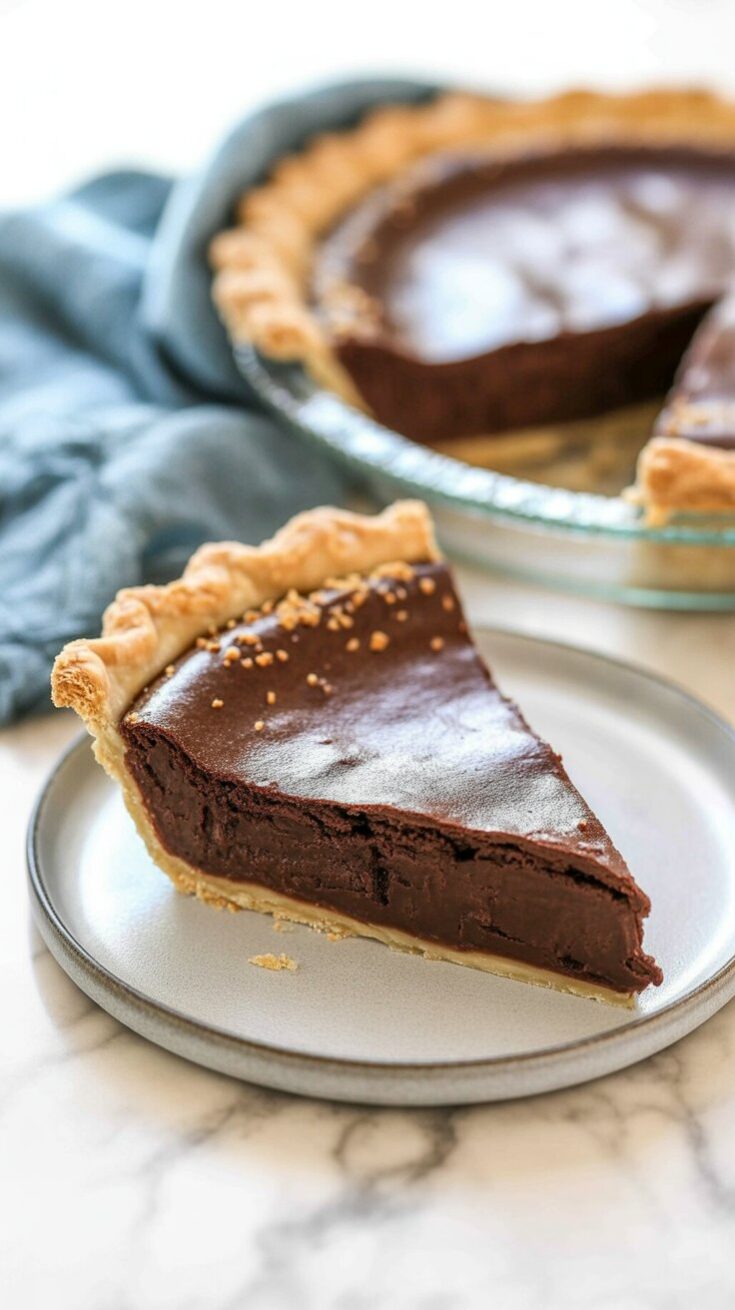
Pour into the crust and bake at 350°F for about 40 minutes. When a toothpick comes out with moist crumbs (not wet batter), it’s ready. Let it cool before slicing.
Pro tip: If you can resist cutting into it for 24 hours, the texture is even better the next day. But I rarely wait that long.
A Few More Handy Tips I’ve Learned
-
Use a glass pie plate. Helps you see when the crust is golden underneath.
-
Don’t overbake. The center should still jiggle slightly when you take it out.
-
Need to stretch it for more people? Serve smaller slices with whipped cream or vanilla ice cream on the side. Works like a charm.
How to Store and Reheat Leftovers
I usually pop the leftover pie in the fridge, lightly covered with foil. It keeps well for up to 4–5 days. You can even freeze individual slices—just wrap in cling film and tuck into a freezer bag.
When you want to enjoy a slice later, I just microwave it for 15–20 seconds. Warm chocolate pie with a scoop of vanilla ice cream is hard to beat.
Quick Questions You Might Have
Do I have to par-bake the crust?
Yes, or the bottom might turn soggy. It’s worth the extra few minutes.
Can I make this ahead of time?
Absolutely. In fact, it slices better after a few hours or even the next day.
Can I use dark cocoa powder?
You can, but it might taste slightly more bitter. Stick to classic if you’re not sure.
What’s the best way to serve it?
Room temperature or slightly warm with whipped cream or ice cream. I’ve even crumbled a slice over cold coffee for an indulgent dessert drink!
Let me know if you try this out—especially if you end up sharing it with kids or neighbors. This fudge pie has quietly become a family tradition around here, and I hope it finds a place in your kitchen too.
Chocolate Fudge Pie
If you’re after a dessert that’s effortlessly rich and deeply chocolatey, this classic fudge pie hits every mark.
Ingredients
- ¾ cup unsalted butter, melted
- 1 ½ cups granulated sugar
- ⅓ cup all-purpose flour
- ⅛ teaspoon salt
- ⅓ cup cocoa powder
- 1 ½ teaspoons vanilla extract
- 3 large eggs
- 1 unbaked 9-inch pie crust
Instructions
- Preheat your oven to 350°F (175°C). In a large microwave-safe bowl, melt the butter and allow it to cool slightly. Whisk in the sugar until the mixture is smooth, though a slight graininess is normal and will dissolve during baking.
- Add the flour, cocoa powder, salt, vanilla extract, and eggs. Mix thoroughly until the batter is silky and evenly combined. Pour this chocolatey goodness into your unbaked pie crust, spreading it out evenly.
- Bake for approximately 40 minutes. You’ll want the center to be just set—check by inserting a toothpick; it should come out with moist crumbs, not wet batter. Avoid overbaking to keep that fudgy texture intact.
- Let the pie cool completely on a rack to allow it to set perfectly before slicing. This resting step enhances the creamy interior and makes serving a breeze.
- This fudge pie is perfect as is or alongside a scoop of vanilla ice cream for an indulgent treat. For an extra touch, a dollop of whipped cream or fresh berries is always welcome.
- Enjoy the simplicity and decadence of this timeless dessert that’s sure to become a family favorite.
Nutrition Information
Yield
8Serving Size
1Amount Per Serving Calories 457Total Fat 25gSaturated Fat 13gTrans Fat 0gUnsaturated Fat 10gCholesterol 116mgSodium 151mgCarbohydrates 54gFiber 1gSugar 38gProtein 5g
TastyFitnessRecipes.com, occasionally offers nutritional information for recipes contained on this site. This information is provided as a courtesy and is an estimate only. This information comes from online calculators. Although tastyfitnessrecipes.com attempts to provide accurate nutritional information, these figures are only estimates.
Try other Fudge recipes: