These bite-sized mini quiches are my favorite kind of back-pocket recipe—reliable, versatile, and always gone too fast. You get a buttery, flaky crust and a creamy egg filling with whatever flavors you love. Make them for brunches, holidays, or just a snacky weekend morning. They’re easier than full-size quiche, don’t need blind baking, and come together with ingredients you probably already have in the fridge.

Why These Tiny Quiches Are Always a Hit in My Kitchen
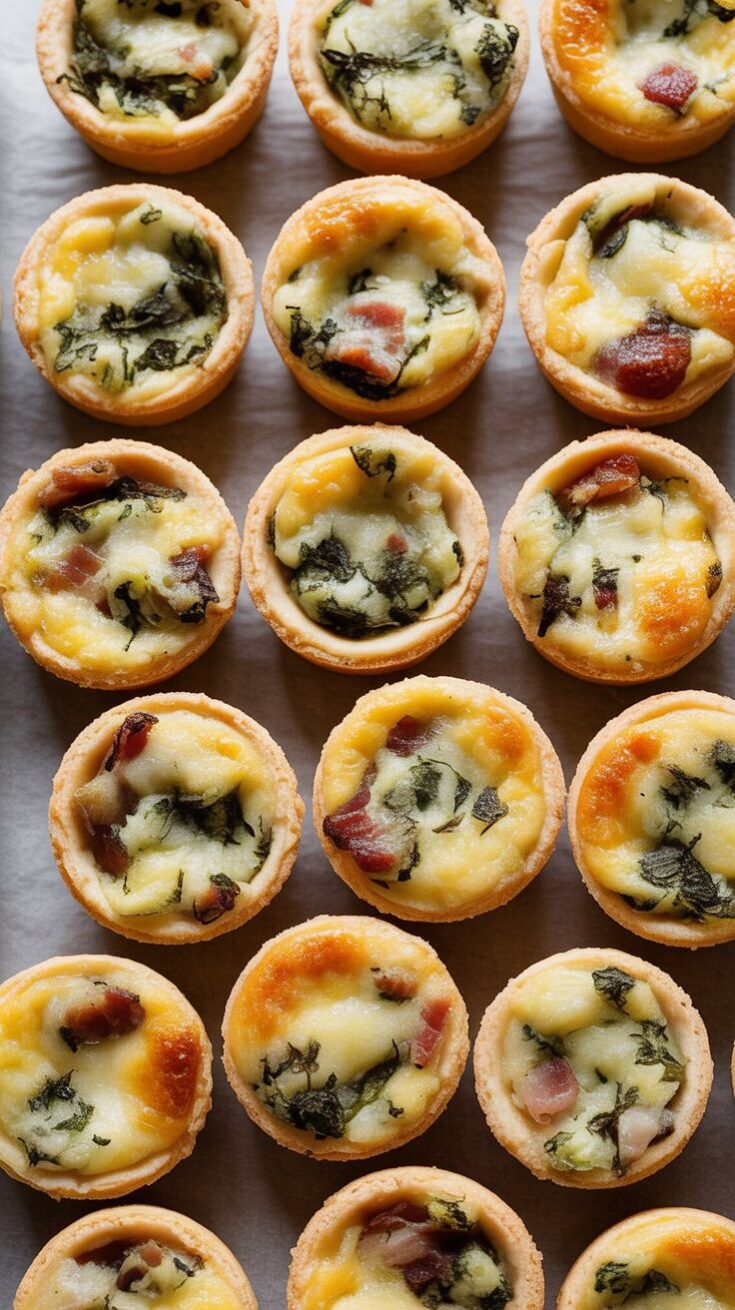
There’s something extra charming about mini quiches. I’ve brought trays of them to baby showers and brunch potlucks, and there’s never a single one left. My daughter calls them “egg cupcakes,” and she’s always sneaking a few before they even hit the table.
What I love most is how endlessly customizable they are. You can make a big batch with a mix of fillings—spinach and mushroom in one row, bacon and cheddar in another, and maybe a veggie-and-feta combo for good measure. It’s a recipe that adapts to your fridge and your mood. Plus, it’s a great one to get the kids involved with. Mine love cutting out little crust circles and sprinkling cheese on top.
What Makes These So Good?
-
Easy to Prep – Way quicker than baking a full-sized quiche.
-
Freezer-Friendly – I stash extras in the freezer and pop a couple in the oven on busy mornings.
-
Custom-Flavored – Add-ins go on top, so you can make different combos in one pan.
-
No Blind Baking Needed – The crusts are small enough to crisp up perfectly on their own.
-
Fun to Make with Kids – Rolling dough and adding toppings keeps little hands happy.
Step-by-Step: How I Make Them
1. Prep the Dough (Make-Ahead Tip)
I usually make pie dough the night before or grab a stash from the freezer. Homemade crust is worth the effort—it’s buttery, flaky, and way better than store-bought. If I’m short on time, I won’t feel bad grabbing a ready-made one, but I always try to have a batch of dough tucked in the freezer.
2. Whisk the Egg Filling
While the dough chills, I whisk together the eggs, milk, and cream. I tuck it in the fridge while I work with the crust to keep everything cool and happy. Cold dough bakes up best.
3. Roll and Cut the Dough
A 2.5-inch cookie cutter is ideal, but I’ve also used a small glass or the back of a metal measuring cup in a pinch. I get about 24 little circles per crust, and re-rolling scraps is totally fine. Just don’t overwork the dough.
4. Press into a Mini Muffin Pan
Grease your pan well and press each dough circle into the bottom and up the sides. They don’t have to be perfect—rustic is charming here.
5. Pour in the Egg Mixture
A measuring cup with a spout makes this step so much easier. Fill each shell just shy of the top. Don’t overfill or they’ll puff up and spill over.
6. Add the Toppings
Here’s the fun part—toppings! Sprinkle them right on top instead of mixing them into the eggs. That way, each mini quiche has its own flavor and the filling stays easy to pour.
7. Bake Until Golden
These bake up fast. Once the crust is golden and the egg is set, they’re done. Let them cool slightly so you don’t burn your tongue with the first bite (ask me how I know…).

Ingredients Breakdown (What I Use and Why)
Pie Crust
Homemade is my go-to. My butter-and-shortening crust is foolproof, but I also have an all-butter version that’s a little more rustic. Either works. If you’re short on time, good store-bought crust can do the job.
Egg Mixture
4 large eggs + 1 cup of milk/cream combo is the sweet spot. I’ve used half-and-half, almond milk, oat milk—you name it. Just know that using all low-fat milk can make the texture a bit wobbly. A mix of milk and cream gives the richest results without being too thick.
Seasoning
A little salt and pepper is all you need. If your toppings are salty (like bacon or feta), go easy on the salt.
Crust-Free Option (Still Delicious)
You can skip the crust and make these crustless. Just grease your muffin pan well (spray works better than butter), pour the egg mixture in, and add your toppings. They bake up like little frittatas—great for gluten-free friends or lighter eating.

My Favorite Flavor Combos
I’ve tested more combinations than I can count, but these always get rave reviews:
-
Ham, Swiss & Scallion – Classic and cozy. Cubed ham, shredded Swiss, and thinly sliced green onions on top.
-
Spinach, Bacon & White Cheddar – I sauté the spinach quickly in leftover bacon grease—it adds a ton of flavor.
-
Mushroom, Pepper & Feta – This is my go-to vegetarian version. I chop everything small so it fits neatly into each cup.
-
Tomato, Mozzarella & Basil – A little caprese twist. I slice cherry tomatoes in half and let them roast right into the egg.
Feel free to mix and match. You can even leave a few plain for picky eaters. I usually make a tray with at least three different combos so everyone gets something they like.
Storage and Freezing Tips
These mini quiches hold up really well:
-
Fridge: Keep them in an airtight container for up to 4 days. Reheat in the oven or microwave.
-
Freezer: Freeze in a single layer, then transfer to a zip-top bag. To reheat, bake straight from frozen at 350°F until warmed through (about 10–15 minutes).
I often make a double batch, freeze half, and save myself some weekday breakfast stress. They’re also great for packing in lunchboxes—just pop one or two into a thermos container and you’re set.
Mini Quiche
These bite-sized mini quiches are the perfect customizable treat for brunch spreads, parties, or as meal-prep snacks throughout the week.
Ingredients
- 4 large eggs
- 1/2 cup heavy cream or heavy whipping cream
- 1/2 cup whole milk
- 1/4 tsp salt
- 1/4 tsp pepper
- 1/2 cup shredded or crumbled cheese (your choice: feta, goat, cheddar, Swiss, gruyere, etc.)
- 3/4 cup assorted add-ins (vegetables, meat, seafood, see tips below)
- 2 unbaked pie crusts (homemade or store-bought)
Instructions
- Prepare and Chill the Dough: Make your pie dough the night before, as it needs at least 2 hours in the fridge. For busy mornings, store-bought works just fine, but make sure it’s thawed.
- Egg Mixture: In a bowl, vigorously whisk together eggs, milk, cream, salt, and pepper until the mixture is smooth and fully blended. Cover and place in the refrigerator while you prep the crusts.
- Get Ready to Bake: Preheat oven to 375°F (191°C). Generously grease two 24-cup mini muffin pans with nonstick spray. If you only have one pan, bake in batches.
- Shape the Mini Crusts: On a floured counter, roll out one chilled dough round into a 12-inch circle. Cut out as many 2.5-inch rounds as possible (re-rolling scraps as needed for about 24 rounds per crust). Quickly transfer dough rounds into the prepared muffin tray, pressing gently into the bottoms and up the sides.
- Assemble: Evenly divide the cold egg mixture between shells. Drop in your preferred mix-ins—veggies, meat, or seafood—then top each with cheese.
- Bake: Slide the trays into the oven and bake for 25–28 minutes, until the centers are set and the crust edges are lightly browned. Let cool for 5 minutes before removing. Use a small spoon to lift quiches from the pans.
- Serve: Enjoy warm or at room temperature. Leftovers are just as tasty—cover and refrigerate for up to 4 days.
Notes
- Make-Ahead: Prepare pie dough ahead and keep it in the fridge (up to 5 days) or freezer (up to 3 months). Baked mini quiches freeze beautifully—just cool completely, layer with parchment, and store up to 3 months.
- Crustless Option: For a lighter twist, skip the crust. Generously grease the muffin tray and bake the egg mixture, add-ins, and cheese directly for 16–19 minutes.
- Standard Muffin Pan: Follow the same method, but cut crusts into 3.5-inch circles and bake slightly longer (27–30 minutes), yielding about 16 regular-sized quiches.
- Filling Ideas: Pre-cook add-ins like bacon, sausage, or onions for maximum flavor. Cheese is your canvas—blend tangy feta, nutty Swiss, or creamy goat cheese for new combinations.
- Dairy Substitutes: All whole milk or nondairy options can be used for the creamier base if desired, though traditional combos yield the best flavor.
Nutrition Information
Yield
50Serving Size
1Amount Per Serving Calories 68Total Fat 5gSaturated Fat 2gTrans Fat 0gUnsaturated Fat 2gCholesterol 21mgSodium 73mgCarbohydrates 5gFiber 0gSugar 0gProtein 2g
TastyFitnessRecipes.com, occasionally offers nutritional information for recipes contained on this site. This information is provided as a courtesy and is an estimate only. This information comes from online calculators. Although tastyfitnessrecipes.com attempts to provide accurate nutritional information, these figures are only estimates.
Final Thoughts
These mini quiches are my secret weapon for feeding a crowd—or just my family on a lazy Sunday morning. They look fancy, taste amazing, and are endlessly flexible. Once you get the hang of the base recipe, you can start creating your own flavor combos with whatever you have in the fridge.
So grab your muffin tin and roll out that dough—this is one of those recipes that makes home cooking feel extra rewarding.
Try other Cupcake recipes: