If you’re looking for a pie crust that’s flaky, tender, and packed with rich buttery flavor, this one’s for you. It’s a simple, no-fuss recipe that’s become my go-to over the years, and it hasn’t failed me once. I’m talking golden, crisp edges, layers of buttery flakes, and a texture that holds up beautifully to any filling — sweet or savory.

Just like many of you, I used to find pie crust intimidating. Too dry, too tough, too messy. But this all-butter version changed the game. After making it dozens of times — and learning from plenty of pie disasters — I’ve figured out all the little tricks that make a big difference. So here’s my full-proof recipe, along with every tip I know to help you feel confident every step of the way.
With this one crust recipe in your back pocket, you’ll be the one everyone comes to for pie advice.
Just 5 Ingredients, but Each One Matters
You only need five ingredients to pull this off, but don’t let the simplicity fool you — each one plays a key role:
- Flour – This is your base, your structure.
- Salt – Trust me, don’t skip it. A little salt sharpens the flavor of the buttery crust.
- Granulated sugar – We’re not making a sweet crust, just giving it a boost in flavor and browning. Plus, sugar helps break down the butter for better texture.
- Unsalted butter, cold – The star. It adds all that beautiful flakiness and flavor. Use unsalted so you can control the saltiness yourself.
- Ice water – This brings the dough together. It needs to be very cold so it doesn’t start melting the butter while mixing.
You’ll find this dough works great for both double crust pies and any decorative topping like lattice or braids. I even use it with a little grated cheddar in my apple-cheddar pie — heavenly. Or swap in cocoa powder for a chocolate crust to pair with something creamy like mousse or pudding.
Step-by-Step Pie Dough
Here’s how I make it:
- Stir the dry ingredients together – Flour, salt, and sugar.
- Cut in the butter – You want small pea-sized bits of butter mixed in — a pastry cutter or your fingers work best.
- Add ice water – Start with a few tablespoons at a time until the dough comes together. It should be soft but not sticky.
- Shape the dough into a ball.
- Cut it in half – This recipe makes enough for two 9-inch crusts.
- Flatten into discs – Wrap each tightly in plastic wrap.
- Chill for at least 2 hours – Don’t skip this step!
If you’re new to making crusts, it really helps to watch the texture develop. Once you’ve done it once or twice, you’ll get a feel for when it’s just right.
Why Cold is King
The colder your ingredients, the better your crust will be. Here’s why:
Cold butter melts slowly in the oven, which lets steam form between the layers of dough. That’s what gives you those flaky layers everyone loves. But if your butter melts too early — like when you’re mixing or rolling — your crust will bake up greasy, flat, and dense. Not what we want!
How to Keep Things Cold:
- Use ice-cold water (I keep a glass of ice water on hand and measure from that).
- Start with butter that’s straight from the fridge or even partially frozen.
- Chill your mixing bowl and flour for a few minutes before starting on hot days.
- After making the dough, let it chill in the fridge for 2 hours minimum.
- If the dough starts to feel soft or sticky while rolling, pop it in the fridge for 10 minutes to firm it back up.
Rolling Out the Dough
Once your dough is nicely chilled, it’s time to roll. Lightly flour your counter, rolling pin, and hands to keep things from sticking. Start in the middle and roll outwards in all directions, gently turning the dough as you go.
If the dough gets too warm or starts to tear, slide it onto a baking sheet and chill it again before continuing.
Tips for Pie Crust Success
Here are a few things I always keep in mind:
- Keep everything cold — yes, I’m repeating it. It’s that important.
- Use a glass pie dish. It helps the crust bake evenly and lets you see when it’s golden on the bottom.
- Blind baking? Use pie weights or dried beans on top of parchment paper to keep the crust flat. It’s essential for pies with creamy fillings.
- Use a pie crust shield to prevent the edges from browning too quickly. A piece of foil with a hole in the center works just as well in a pinch.
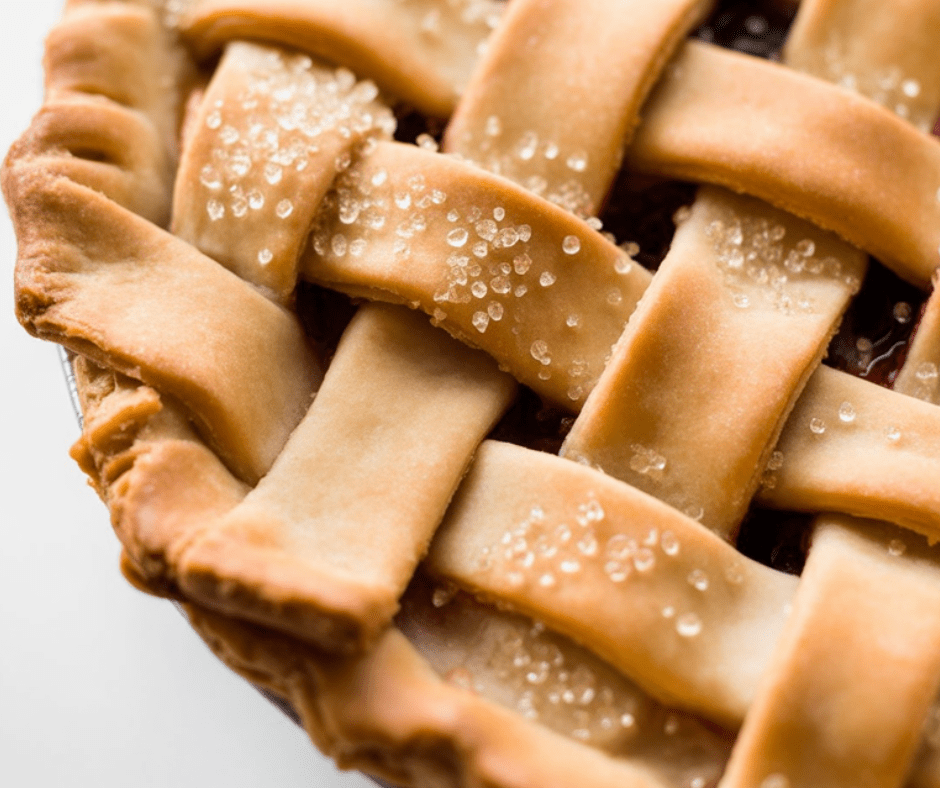
Want to get fancy? Try braiding the crust, making a lattice top, or crimping the edges for extra flair. These aren’t just for looks — they help hold everything in place, too.
Troubleshooting Pie Dough
- Dough keeps cracking? You probably need more water. A slightly wetter dough is easier to work with — you can always dust on a bit more flour.
- Crust is too tough? You may have overworked the dough or didn’t use enough butter. Be gentle when mixing and rolling.
- Edges getting too dark? Shield them partway through baking to avoid burning.
My Favorite Tools
Here’s what I use every time I make this crust:
- Pastry cutter – For working the butter into the flour.
- Rolling pin – A classic wooden one or marble if you want to stay fancy and cool.
- Glass pie dish – I swear by my old Pyrex. It bakes evenly every time.
- Pastry brush – Perfect for adding that golden shine with an egg wash.
- Pie weights – Especially if you’re blind baking.
- Pizza cutter or pastry wheel – For making clean strips if you’re doing a lattice top.
- Pie crust shield – Silicone ones are adjustable and much easier to use than foil.

How to Store Pie Dough
You can keep the wrapped dough discs in the fridge for up to 3 days. If you’re planning ahead, freeze them for up to 3 months. Thaw overnight in the fridge before using.
If you’ve already rolled the dough and placed it in a pie dish, you can freeze the unbaked crust (tightly wrapped) and bake it straight from frozen — just add a few extra minutes to the baking time.
Serving Suggestions
This crust goes with just about anything. It’s perfect for:
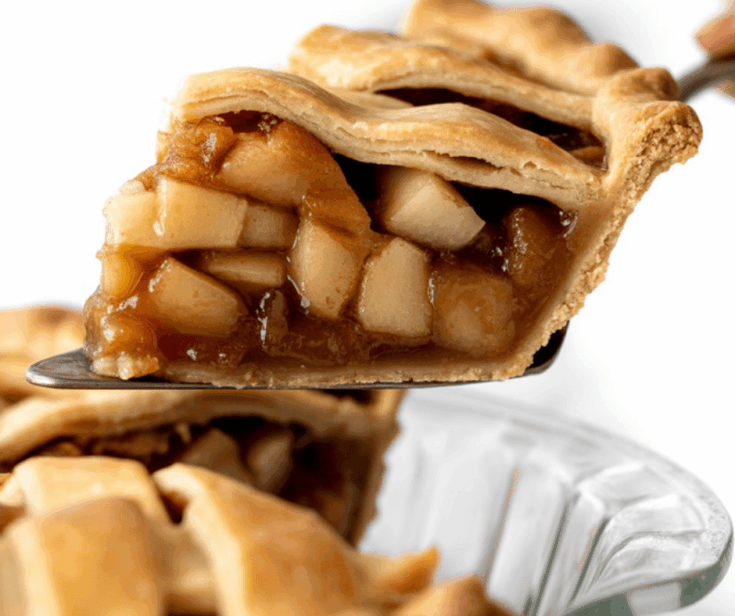
- Apple pie (especially with cinnamon and chai spices)
- Quiches and savory tarts
- Berry pies with a crumb topping
- Pecan or pumpkin pie during the holidays
I love pairing it with fruit fillings that have a touch of spice — cinnamon, nutmeg, or ginger really play up the buttery flavor.
FAQs
Can I make this crust with salted butter?
Technically yes, but I don’t recommend it. Salted butter varies in salt content, and it’s better to control the seasoning yourself with unsalted butter.
Can I use this for a savory pie?
Absolutely. Just leave out the sugar if you want to make a crust for quiches or pot pies.
Why is my dough so sticky?
It might be too warm or have too much water. Try chilling it for 10–15 minutes before rolling, and use a light dusting of flour.
Can I use whole wheat flour?
Yes, but your crust will be a bit denser and less flaky. I usually swap in about 25–30% whole wheat and keep the rest all-purpose.
All Butter Pie Crust
If you’ve ever dreamed of mastering homemade pie crust, this one’s your ticket in. This all-butter pie crust is rich, flaky, and full of that classic homemade flavor we all love. I’ll walk you through the full process — with tips, techniques, and everything I’ve learned over the years — so you can bake like a pro, even if it’s your first pie.
Ingredients
- 2 and 1/2 cups (313g) all-purpose flour, plus extra for dusting (spooned and leveled)
- 2 teaspoons granulated sugar
- 1 teaspoon salt
- 1 cup (16 Tbsp; 226g) unsalted butter, chilled and cut into small cubes
- 1/2 cup (120ml) ice water, plus a little extra if needed
Instructions
- In a large mixing bowl, stir together the flour, sugar, and salt.
- Add your chilled, cubed butter right into the bowl. Using a pastry cutter, food processor, or two forks (pastry cutter is my top pick), work the butter into the flour mixture. You want to see small, pea-sized bits — those buttery chunks are what give you flakiness later.
- Fill a cup with water and ice, give it a stir, then measure out 1/2 cup (120ml) of cold water. Drizzle in 2 tablespoons at a time, stirring gently after each addition. Stop once the dough starts to hold together and forms soft clumps. It should feel slightly sticky and moist, but not wet or tacky. I usually end up using the full 1/2 cup.
- Transfer the dough onto a lightly floured surface. With floured hands, fold and press it together until it comes together and the flour is fully blended in. Shape it into a ball, then divide into two equal halves.
- Flatten each half into a thick disc, about 1-inch high. Wrap them up tightly in plastic wrap and refrigerate for at least 2 hours — or up to 5 days — before rolling them out for your pie.
- Once your dough is chilled, it’s ready to roll. Lightly flour your work surface, rolling pin, and hands. Start in the middle of the disc and roll outwards, turning the dough as you go to keep the shape even. If you spot cracks around the edges, just gently press them back in.
- Use the rolled-out dough as your pie recipe directs — whether you’re blind baking, par-baking, or going straight into filling and baking.
Notes
- If you’re wondering how this crust stacks up to a butter-and-shortening combo, here’s the scoop:
Using all butter gives you a lighter, flakier texture with more definition in each layer. That’s because butter releases steam as it bakes, creating those delicate layers we crave. Plus, the flavor is unmatched — it’s rich, golden, and downright irresistible. - Now, when it comes to shaping and decorating (think braids, lattice, or fancy crimps), the butter + shortening crust wins slightly for ease. Shortening holds its shape better thanks to its higher melting point. So if you’re planning an intricate design, you might want to check out that version. But both are excellent, and this all-butter crust is always my first choice for flavor.
- Swap out 1 tablespoon of your ice water for cold apple cider vinegar. It makes the crust even more tender and flaky — and adds a subtle tang that works especially well with fruit pies.
- After step 4, the wrapped dough discs can be frozen for up to 3 months. When you’re ready to bake, thaw them in the fridge overnight.
Nutrition Information
Yield
2Serving Size
1Amount Per Serving Calories 181Total Fat 6gSaturated Fat 4gTrans Fat 0gUnsaturated Fat 2gCholesterol 15mgSodium 1106mgCarbohydrates 28gFiber 1gSugar 4gProtein 3g
TastyFitnessRecipes.com, occasionally offers nutritional information for recipes contained on this site. This information is provided as a courtesy and is an estimate only. This information comes from online calculators. Although tastyfitnessrecipes.com attempts to provide accurate nutritional information, these figures are only estimates.
Whether you’re making pie for a cozy Sunday afternoon or preparing for a holiday table, this crust won’t let you down. It’s easy, reliable, and full of that buttery goodness that takes every pie to the next level.
Try other pie recipes: