If you’ve ever bitten into a slice of apple pie and thought, “Hmm, not bad… but something’s off”—maybe it was the soggy base, maybe mushy apples, maybe just too sweet—then welcome, friend. You’re in good hands. This version is the one that finally gave me that “this is it” feeling. It’s rich with cinnamon-spiced apples, a buttery flaky crust that actually stays crisp, and not a soggy bite in sight. And the trick? Bake the apple slices first.

Why This Apple Pie Works (And Why I’ll Never Make It Another Way)
Years ago, I kept trying different apple pie recipes, and something always bugged me. Either the apples turned to mush, the crust got sad and soggy, or the top looked beautiful but hid an empty space inside like a pie version of a deflated balloon. After too many disappointments (and some aggressively scooped-out middles), I decided to figure out a pie that fixes all of this.
The baked apple method was the game-changer. No watery filling, no half-cooked apples, and finally—no hollow domes under that beautiful lattice crust. Just a packed, juicy filling and golden flaky pastry all around. Once I nailed this, I never looked back.
What Usually Goes Wrong (And How We Fix It)
Before I walk you through what to do, let’s quickly talk about what we’re not doing.
-
No raw apples straight into the pie. They shrink. A lot. That’s why you end up with a huge gap between the crust and the filling.
-
No skipping blind-baking. If you want a crust that holds up without turning gummy, you’ve got to give it a head start.
-
No syrupy soup inside. Runny filling ruins a good slice. We take care of those juices.
-
No spice overload. I love cinnamon, but the apples are the star here.
This recipe solves all of that with a few smart steps and a little extra time that pays off big.
Ingredients That Actually Make Sense
Let’s break this down the way I’d explain it to a friend standing in my kitchen.
-
Granny Smith Apples – Tart, sturdy, and they hold their shape. I’ve tried mixing varieties, but Granny is the one I trust most.
-
Brown Sugar – Adds a deep, slightly molasses-y sweetness that works beautifully with the apples.
-
Cinnamon, Ginger, Nutmeg – A classic trio. Enough to bring warmth but not so much that it tastes like potpourri.
-
Butter – We simmer it with the apple juices to make a glossy syrup that adds richness and keeps the pie from turning soggy.
-
Salt – Just a pinch. It wakes everything up.
-
Egg – For that golden shiny top. Makes the pie look like it came from a bakery.

Let’s Talk Crust
I use a classic all-butter shortcrust pastry here. Yes, some folks swear by shortening, but for me? Butter all the way. I want my crust to taste like something, not just flake apart.
I usually make mine in the food processor because my hands tend to warm the dough too fast. Also, it’s just faster—especially when I’m baking before dinner guests arrive or juggling too many pans at once.
Once it’s mixed, I divide it into two discs, wrap them up, and let them chill. It’s worth the wait.
How to Make the Apple Pie (The Real-Life Way)
Step 1: Prep the Crust
Make your shortcrust dough and roll it out to line your pie tin. I like metal tins for this—they really do give the crispiest base. After lining the tin, prick the base and freeze the whole thing. Frozen dough doesn’t shrink as much when baked, which means no busted crusts. Trust me, I’ve been there.
Step 2: Bake the Apple Slices
While your crust is chilling, peel and slice the apples. Toss them with the spice and sugar mix—doing this in a separate bowl helps them coat evenly. Then bake them on trays until they’re tender but not mushy. I check mine at the 20-minute mark and go from there.
Drain the juices and simmer them with a bit of butter until syrupy. This step adds so much flavor and keeps the crust crisp.
Let the apples cool a bit while you blind-bake the crust.
Blind Baking the Crust (Don’t Skip This)
Take your frozen pie shell, cover it with parchment, and load it with baking weights (or rice, or beans—whatever you’ve got). Bake it until it starts to look set, remove the weights, brush the inside with egg wash, and pop it back in the oven. That little egg wash trick? It’s like putting a raincoat on your crust.
Let the crust cool before adding the filling. You want it crisp, not soggy.
Assembling the Pie
Once your apples and crust are both cooled, it’s time to fill. I use about two-thirds of the apple slices to pack the base and then layer the rest on top for a little mound in the center. Pour the syrup and any remaining juices over the apples. Now it’s ready for its lid.
Lattice Top (Easier Than It Looks)
Roll out your second dough disc and cut 12 even strips. You don’t need to be a perfectionist here—just aim for similar width. Lay 6 strips one way, fold back every other one, and weave the remaining strips across. If you’re nervous, this is a great place to pause and watch a quick video.
Press the edges to seal and trim the extra. A quick brush of egg wash and a sprinkle of sugar on top gives you that glistening, golden finish.
Bake and Cool
Bake for 45 minutes until it’s beautifully golden and bubbling inside. The hardest part? Waiting. You’ve got to let it cool for a few hours before slicing. This helps everything settle so you don’t end up with a pie that spills apart.
If you’re after super neat slices (like the kind you’d serve guests), chill it overnight. The next day, it’ll cut like a dream, and you can reheat it gently in the oven.

Serving Tips (This Part’s Non-Negotiable)
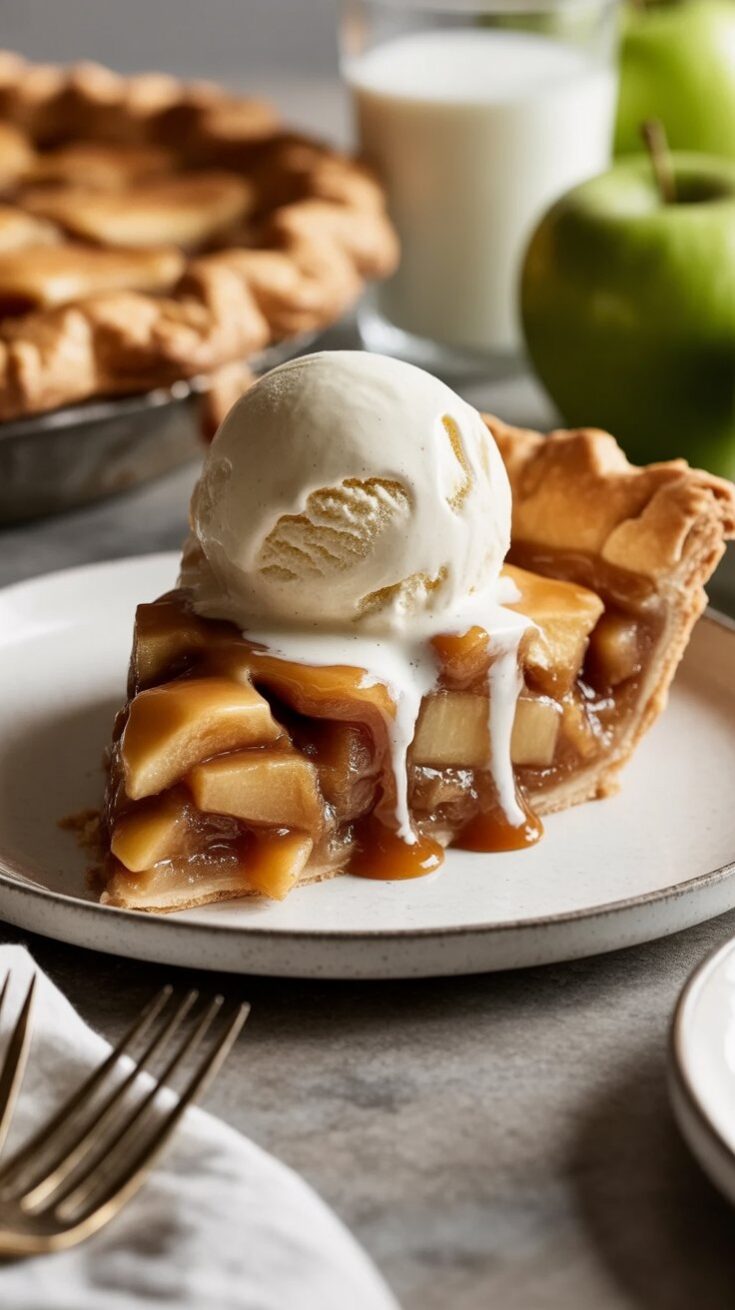
Warm apple pie without vanilla ice cream? I don’t think so. Serve it with a big scoop—or whipped cream if that’s your thing. I’ve even had it with a drizzle of salted caramel sauce once, and it was over-the-top in the best way.
Best Pie Dough for Apple Pie
There's nothing quite like the warm, spiced aroma of a classic apple pie coming out of the oven.
Ingredients
- 2kg (4 lbs) Granny Smith apples, peeled, cored, halved, and sliced 1 cm thick
- 1 tsp ground cinnamon
- 3/4 tsp kosher salt
- 1/4 tsp ground nutmeg
- 1 cup brown sugar
- 1/2 tsp ground ginger
- 1 tsp unsalted butter
- 2 tsp white sugar (for topping, optional)
- 2 discs shortcrust pastry (homemade or store-bought)
- 1 egg, beaten (for egg wash)
- Vanilla ice cream or whipped cream (for serving)
Instructions
- Prepare the Pastry: Shape two discs of shortcrust pastry and let them chill in the refrigerator for at least an hour. Roll out one disc to fit a 23cm/9” metal pie tin, leaving the pastry a little thicker for the base. Trim the edges, lightly prick the bottom, and freeze the shell for two hours—this helps prevent shrinkage and a soggy bottom.
- Mix the Filling: While the base chills, preheat your oven to 180°C (350°F). In a large bowl, toss the apple slices with brown sugar, cinnamon, ginger, nutmeg, and salt until evenly coated.
- Bake the Apples: Spread the apple mixture over two baking trays. Bake until just tender but not mushy—start checking at 15 minutes and every 5 minutes after (some apples may take up to 40 minutes). As the apples bake, their juices will be released.
- Make the Syrup: Drain the juices from the trays into a small saucepan. Add butter, then simmer over low heat until reduced to a syrup, about 3–5 minutes. Set syrup aside to cool.
- Blind Bake the Crust: Increase oven temperature to 200°C (400°F). Remove the crust from the freezer, line with parchment, and fill with baking beads or uncooked rice. Bake for 25 minutes, then lift out the weights. Brush the inside of the crust (not the rim) with beaten egg, and bake for another 5 minutes until the shell is light golden. Let cool for about 15 minutes.
- Assemble the Pie: Layer about two-thirds of the cooled apple slices into the prepared crust, gently pressing them to remove air pockets. Pile the remaining apples on top to create a gentle mound in the center. Drizzle over the cooled apple syrup and any leftover juices from the trays.
- Lattice the Top & Bake: Roll out the remaining pastry disc to about 1/8” thick and cut into strips. Arrange the strips in a lattice over the filled pie, trimming and sealing the edges with a little water. Brush the lattice with more egg wash and sprinkle with white sugar for sparkle.
- Bake: Bake in the preheated oven for about 45 minutes, or until the top is golden and the filling is bubbling up through the lattice.
- Cool and Serve: Let the pie cool for at least 3 hours before slicing so the filling sets. Serve slices with a generous scoop of vanilla ice cream or a dollop of cream.
Notes
- Using metal pie tins gives the best crisp base.
- Blind baking and baking the apples first are the secrets to avoiding a soggy crust and undercooked filling.
- Granny Smith apples hold their shape and provide just the right amount of tartness—others may turn too soft or dry when baked.
- This pie keeps in the fridge up to four days, although it’s best within the first 24 hours.
Nutrition Information
Yield
12Serving Size
1Amount Per Serving Calories 152Total Fat 5gSaturated Fat 3gTrans Fat 0gUnsaturated Fat 2gCholesterol 29mgSodium 146mgCarbohydrates 26gFiber 1gSugar 21gProtein 2g
TastyFitnessRecipes.com, occasionally offers nutritional information for recipes contained on this site. This information is provided as a courtesy and is an estimate only. This information comes from online calculators. Although tastyfitnessrecipes.com attempts to provide accurate nutritional information, these figures are only estimates.
Final Thoughts
This is the apple pie I make when I really want to make someone feel at home. It’s cozy, nostalgic, and just the right balance of tart and sweet, crisp and soft. If you’ve been chasing the perfect pie—or you’ve just been settling for “good enough”—this one’s worth the extra step of baking those apples first.
And once you try it, I bet you’ll never go back either.
Try other Pie recipes: