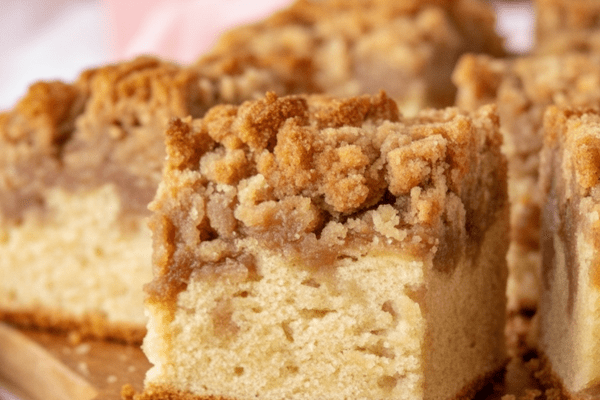
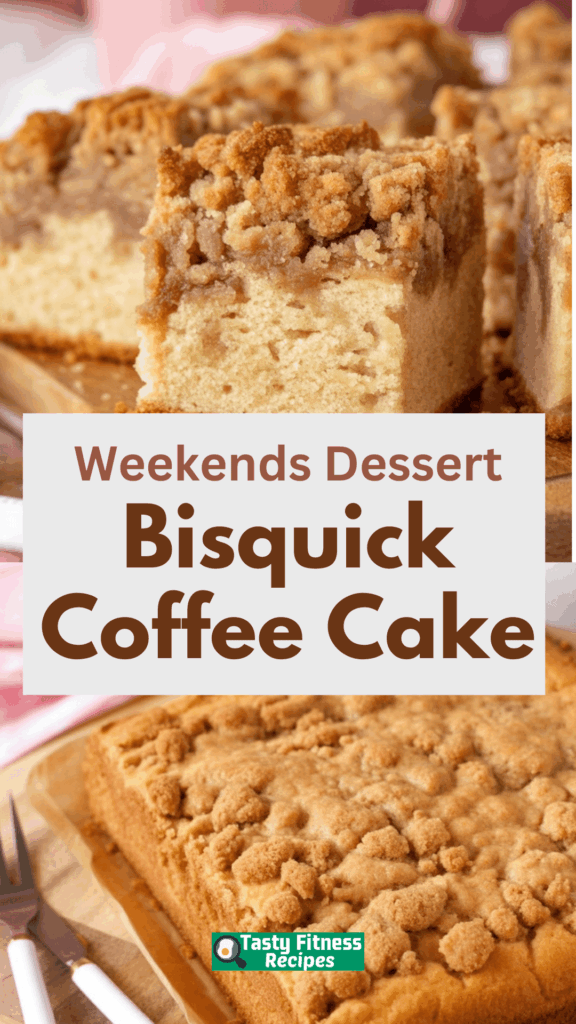
There’s something so comforting about an old-fashioned coffee cake with a thick, sweet cinnamon crumble on top. This Bisquick Coffee Cake is one of those reliable recipes I keep coming back to, especially on slow weekend mornings. It’s quick, easy, and always smells amazing while baking.

I first found this recipe years ago on the back of a Bisquick box and scribbled it into a worn notebook I keep for tried-and-true favorites. Over time, I’ve made little tweaks, but the heart of it is the same—a super-soft, buttery cake with a crazy generous crumb topping. If you’ve got a box of Bisquick in your pantry, you’re halfway there.
A Tasty Bisquick Breakfast
This is the cake I pull out when I want something warm and special for brunch but don’t have hours to fuss in the kitchen. My family loves it with coffee or tea in the morning, and I’ve been known to sneak a slice in the afternoon with an extra swirl of melted butter on top.
The best part? It’s a semi-homemade recipe that makes you look like you worked way harder than you did. The Bisquick mix does most of the heavy lifting, and the cinnamon streusel is so thick it practically deserves its own spotlight.
If you’re after something that feels homemade but fits into a busy morning routine, this coffee cake is the answer.
Frequently Asked Questions
Can I use a homemade baking mix?
Yes, you can! I’ve made this using a homemade Bisquick-style mix, and it works just fine. Just make sure your mix has the right balance of flour, fat, and leavening. If you’re feeling more ambitious one day, you can go fully from scratch with your favorite crumb cake recipe. But honestly, sometimes the box mix is just what you need on a sleepy morning.
This streusel topping seems like a lot. Is that correct?
It’s supposed to be a lot. This is a cake for crumble lovers—big, generous clumps that bake into sweet, cinnamon-packed bites. I always tell people not to worry when they see how much topping there is. I press it gently into the batter so it sticks a bit, and it ends up baking into the cake in the most delicious way. If you don’t love thick crumble, you might want to try another recipe, but for me this is the star of the show.
How do you measure Bisquick?
This is so important. If you’ve ever ended up with dry, crumbly pancakes or dense biscuits, it’s usually from packing the mix into the measuring cup. For this cake, I always fluff the mix with a fork first and spoon it lightly into my cup before leveling it off with a knife. No tapping or pressing down. I know it seems picky, but it really does make the difference between a moist cake and a dry one.
Can I add anything to the top?
Definitely. Sometimes I dust the cooled cake with a little powdered sugar to make it look extra pretty. A drizzle of simple powdered sugar glaze is great if you want to lean into the sweetness. But honestly, I often leave it as-is—the topping is already so rich and cinnamon-y that it doesn’t need much else.
Can this recipe be doubled?
Yes! I’ve doubled it many times for family brunches. Just use a 9×13-inch pan and extend the baking time a bit. I check for doneness with a toothpick in the center—if it comes out clean, you’re good. The smell alone will tell you it’s close to ready.
How do I store leftover coffee cake?
I usually just cover the pan with foil or transfer slices to an airtight container. It keeps well at room temperature for up to three days. If you’re lucky enough to have any left after that, you can freeze it. I wrap individual squares tightly in plastic wrap and foil and freeze for up to three months. When I want a treat, I let one thaw on the counter or pop it in the microwave for about 20 seconds to warm it up. Perfect with coffee.
Ingredients Needed
Here’s what you’ll want to have on hand:
- Bisquick mix: Be gentle with measuring. Think of it like flour—spoon and level rather than scooping from the box.
- Whole milk: I like using whole milk for the added richness. Buttermilk is a great twist for extra tang and moisture.
- Granulated sugar: You can use a sugar substitute if you like, but I keep it classic.
- Eggs: Letting them come to room temperature makes mixing easier, but don’t stress if you forget.
- Vanilla extract: Always makes baked goods smell amazing.
- Salted butter: I use salted butter for balance. You can use unsalted if that’s what you have.
- Light brown sugar: This is the one you do pack into the measuring cup.
- Ground cinnamon: The soul of the topping. I’m generous with it, but you can adjust if you prefer a milder flavor.
Bisquick Coffee Cake
There’s something undeniably comforting about the aroma of cinnamon and sugar wafting through the kitchen early in the morning.
Ingredients
For the Cake:
- 2½ cups Bisquick baking mix (measured lightly—more on that below)
- ¼ cup granulated sugar
- ⅔ cup whole milk
- ¼ cup (½ stick) melted salted butter (unsalted works too)
- 2 large eggs, room temperature
- 1 tablespoon vanilla extract
- ¼ teaspoon ground cinnamon (optional, but lovely)
For the Crumb Topping:
- ½ cup (1 stick) salted butter, melted
- 2 cups Bisquick baking mix
- ⅔ cup packed light brown sugar
- 1½ teaspoons ground cinnamon
Instructions
- Preheat and Prep: Begin by preheating your oven to 350°F. Lightly grease an 8x8-inch or 9x9-inch baking dish with nonstick spray, or line it with parchment paper for easier cleanup.
- Make the Batter: In a large bowl, whisk together the Bisquick, sugar, milk, melted butter, eggs, vanilla, and cinnamon until the mixture is smooth. The batter will be thick, almost like a muffin batter—that’s exactly what you want.
- Spread the Batter: Pour the batter into your prepared baking dish and spread it out evenly. Set it aside while you prepare the topping.
- Mix the Crumb Topping:In a separate bowl, stir together the melted butter, Bisquick, brown sugar, and cinnamon until big, soft crumbs form. You can use a fork or even your fingers to gently pull it all together.
- Add the Topping: Sprinkle the crumb mixture generously over the batter. It may seem like a lot, but trust me—it bakes into a beautifully thick layer of sugary goodness. You can gently press it down into the batter to help it stick.
- Bake: Place your cake on the middle rack and bake for 45–50 minutes. You’ll know it’s ready when a toothpick comes out clean from the center. Keep an eye on it as bake time can vary slightly depending on the dish you use.
- Cool & Slice: Let the cake cool completely before slicing. It makes for a perfect breakfast treat, afternoon pick-me-up, or a comforting dessert with your favorite cup of coffee.
Notes
- Measuring Bisquick: Avoid packing the mix into your measuring cup. Think of it like flour—fluff it first, then gently spoon it into your cup and level off. This keeps the texture soft and prevents a dry cake.
- Love a thick topping? This recipe’s for you. If you're more into delicate crumbles, you might want to reduce the topping slightly (but really... why would you?).
- Pan Matters: If you're using an 8x8-inch dish, make sure it’s at least 2 inches deep. This cake rises nicely and you don’t want it spilling over.
Nutrition Information
Yield
9Serving Size
1Amount Per Serving Calories 372Total Fat 12gSaturated Fat 4gTrans Fat 0gUnsaturated Fat 7gCholesterol 47mgSodium 805mgCarbohydrates 59gFiber 2gSugar 27gProtein 7g
TastyFitnessRecipes.com, occasionally offers nutritional information for recipes contained on this site. This information is provided as a courtesy and is an estimate only. This information comes from online calculators. Although tastyfitnessrecipes.com attempts to provide accurate nutritional information, these figures are only estimates.
How to Make Bisquick Coffee Cake
- Preheat and Prep
Heat your oven to 350°F. Line an 8×8-inch pan with parchment paper and spray it lightly. This makes it so easy to lift out later for nice clean cuts. - Make the Batter
In a big bowl, mix the Bisquick, sugar, milk, melted butter, eggs, vanilla, and cinnamon until it’s smooth. The batter will be thick—that’s normal. I use a rubber spatula to scrape the sides to make sure everything is incorporated. - Spread in the Pan
Pour the batter into your prepared pan and smooth it out. This is when the anticipation starts—I always lick the spatula because it’s too good not to. - Make the Crumble Topping
Melt the butter in a microwave-safe bowl, then stir in Bisquick, brown sugar, and cinnamon until you get those beautiful large clumps. Don’t panic if it seems like a mountain of crumble. That’s exactly what you want. - Add the Topping
Sprinkle the crumble evenly over the batter. I gently press it down so it sticks a bit. Some of it will sink in while baking, creating those gooey, sweet pockets that make this cake special. - Bake
Bake for 45 to 50 minutes on the middle rack. I start checking around 45 minutes with a toothpick in the center. You’re looking for clean or with just a few crumbs, not wet batter. The smell in the kitchen at this point is amazing. - Cool and Slice
Let the cake cool before slicing—it’s hard to wait, but you’ll get cleaner pieces. Sometimes we just dig in warm and eat it straight from the pan. No shame.
This cake is everything I love about home baking: easy, cozy, and totally satisfying. It’s the kind of recipe I make for lazy Sunday mornings, potlucks, or just because someone in the house says they’re craving something sweet. I hope you try it and make it your own family favorite.
Try other recipes: