There’s something so comforting about classic chocolate fudge, and this Hershey’s Rich Cocoa Fudge is exactly that. It’s old-school, rich, and melts in your mouth the way only real homemade fudge can. Made with just a few pantry ingredients, this one’s perfect for when that chocolate craving hits hard — no fancy equipment, no oven, just pure cocoa bliss.

A Little Story from My Kitchen
One rainy afternoon, I found myself digging through the kitchen for something sweet but simple. I had no cream, no chocolate chips — just basic stuff. That’s when I remembered the old Hershey’s cocoa tin in the back of the cupboard. A little butter, sugar, milk, and cocoa, and magic happened on the stovetop. I let it cool, sliced it up, and that was it — pure nostalgia in every bite. Now it’s become a staple in my kitchen, especially during festivals or when guests pop by unannounced.
Why This Hershey’s Fudge Always Works
- It’s insanely easy — four ingredients, one pan, no baking.
- Old-fashioned goodness — no corn syrup, no marshmallow fluff, just cocoa and love.
- Great for any occasion — perfect for gifting, holidays, or sneaky midnight snacking.
- Customizable — want to add nuts or a little twist? You absolutely can.
What You’ll Need
For the Fudge Base:
- Milk: I prefer using full-fat milk for the best texture, but if you’re dairy-free, almond or oat milk works too.
- Sugar: Regular granulated sugar is perfect here. It adds sweetness and helps the fudge set right.
- Butter: Unsalted butter gives the fudge its creamy richness and balances the sweetness.
- Hershey’s Cocoa Powder: That’s where all the deep chocolate flavor comes from. Any good-quality unsweetened cocoa will do if Hershey’s isn’t available.
How I Make This Fudge Step by Step
- Start with the base. In a heavy-bottomed saucepan, combine milk and sugar. Place over low to medium heat and stir until everything dissolves and it comes to a light boil.
- Add the butter. Toss in your butter and stir continuously until it’s fully melted into the mixture.
- Let it thicken. Lower the heat and simmer for about 15–20 minutes, stirring the whole time. You’ll notice it starts thickening — don’t walk away here, it needs your full attention to avoid burning.
- Take it off the heat. Once thick, remove from heat immediately.
- Mix in cocoa. Transfer to a large bowl. Slowly sift in cocoa powder, a little at a time, mixing well to avoid lumps.
- Shape it. Pour the fudge onto a plate lined with cling film. Shape it into a block or square, then wrap it tightly.
- Cool it down. Let it rest at room temperature first, then pop it in the fridge for at least 4 hours until firm.
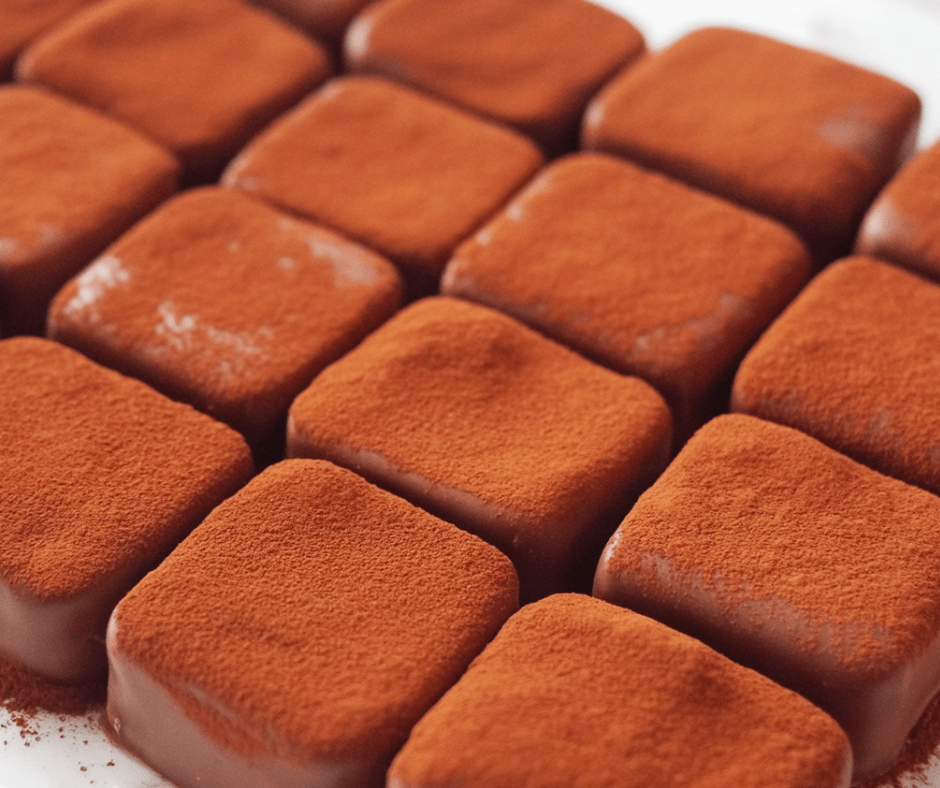
- Coat it in cocoa. Dust a board with cocoa powder. Unwrap the fudge, place it on the board, and gently roll or dust the outside.
- Slice and serve. Cut into bite-sized squares and coat the sides with more cocoa if you like. Plate them up and enjoy!
Fun Ways to Change It Up
- Nutty Twist: Add chopped walnuts, pecans, or almonds. They add crunch and go beautifully with the chocolate.
- Cherry Almond Fudge: Throw in dried cherries and almonds for a fruity, chewy texture.
- Classic Vanilla: A teaspoon of vanilla extract turns it into a classic chocolate-vanilla duo.
- Coffee Kick: Stir in a bit of instant espresso powder for that mocha vibe.
- Rocky Road Style: Add marshmallows and chopped nuts for a childhood favorite in every bite.

How to Serve Hershey’s Fudge
- Just slice it into neat little squares and serve it on a pretty plate.
- You can dust them with cocoa powder right before serving for that rustic look.
- For a dessert spread, pair it with cookies, brownies, or fresh berries on a platter.
- Wrap in parchment and tie with twine for a beautiful homemade gift.
Tips to Nail It Every Time
- Keep stirring. From start to finish — this prevents it from sticking and burning.
- Don’t rush the simmer. It needs time to thicken, and you’ll be tempted to speed things up. Don’t.
- Cool it slowly. Letting it cool on the counter first gives the texture time to settle before refrigerating.
- Use a non-stick saucepan or heavy-bottomed pan — it makes cleanup and stirring much easier.
Hershey Cocoa Fudge
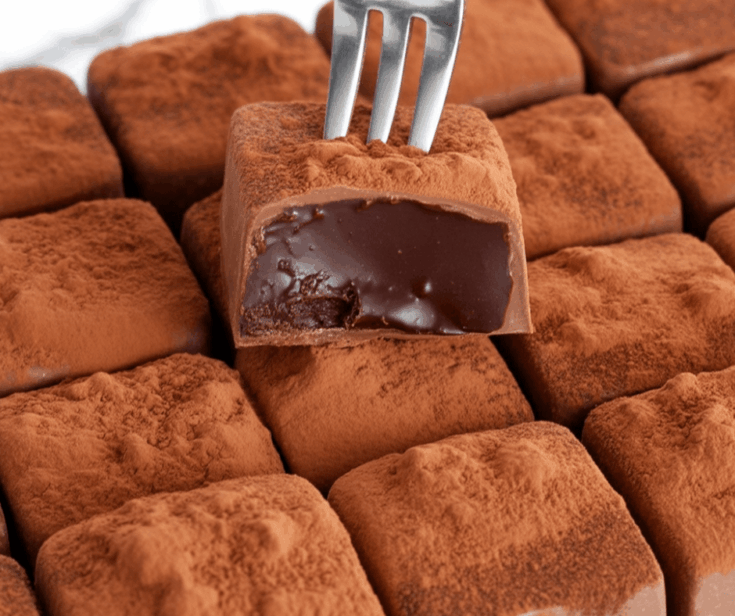
This smooth and indulgent Hershey’s Cocoa Fudge delivers rich chocolate flavor with every bite. Made with simple pantry staples, it’s a nostalgic dessert that’s perfect for satisfying your sweet tooth.
Ingredients
- 600 ml milk
- 160 g sugar
- 15 g butter
- 130 g Hershey’s cocoa powder
Instructions
- In a saucepan, mix together the milk and sugar. Heat over low to medium, stirring constantly until it starts to gently boil.
- Add in the butter and stir until it fully melts and the mixture is smooth.
- Lower the heat and let it simmer for 15–20 minutes, continuing to stir until it thickens.
- Once the mixture reaches a thick, fudge-like texture, take it off the heat.
- Transfer the hot mixture to a mixing bowl.
- Gradually sift in the cocoa powder, beating well after each addition until fully mixed.
- Spread the mixture onto a cling film-lined plate.
- Form it into a rectangle and wrap it tightly in the cling film.
- Let it cool at room temperature, then refrigerate for at least 4 hours until it firms up.
- Dust a clean cutting board with cocoa powder.
- Unwrap the fudge and place it on the cocoa-dusted board.
- Sift more cocoa powder over the top.
- Cut into squares and roll each piece in cocoa to coat all sides.
- Place the finished pieces on a serving plate and enjoy.
Notes
- Slow Simmer: I prefer keeping the heat low and letting it simmer gently to avoid burning while thickening.
- Cocoa in Batches: Adding the cocoa gradually helps ensure a smooth texture without lumps.
- Tight Wrap: After shaping, I wrap the fudge tightly in cling film to help it set with neat edges.
- Proper Chill: Letting it chill for at least 4 hours ensures it firms up enough to slice cleanly.
- Coat Well: Rolling each square in cocoa keeps them from sticking and adds a rich, chocolatey finish.
Nutrition Information
Yield
24Serving Size
1Amount Per Serving Calories 65Total Fat 2gSaturated Fat 1gTrans Fat 0gUnsaturated Fat 0gCholesterol 3mgSodium 16mgCarbohydrates 11gFiber 1gSugar 8gProtein 2g
TastyFitnessRecipes.com, occasionally offers nutritional information for recipes contained on this site. This information is provided as a courtesy and is an estimate only. This information comes from online calculators. Although tastyfitnessrecipes.com attempts to provide accurate nutritional information, these figures are only estimates.
FAQs
What is fudge exactly?
Fudge is a dense, sweet treat made by cooking sugar, milk, and butter to a soft-ball stage, then beating until creamy. This version uses cocoa for a rich chocolate taste.
Can I make this dairy-free?
Yes! Swap the milk for almond or oat milk and use plant-based butter. The texture may vary a little, but it still works.
How do I store leftover fudge?
Keep it in an airtight container in the fridge for up to a week. You can also freeze it for up to 3 months — just thaw before serving.
Why does my fudge turn grainy?
Usually, that’s because the sugar crystallized. Make sure to stir consistently and avoid scraping the sides of the pan when pouring.
Can I double the recipe?
Absolutely. Just use a larger pan and make sure everything heats evenly.
If you’re looking for an easy, nostalgic treat that makes people smile, this Hershey’s Cocoa Fudge is the one. I’ve made it more times than I can count, and it never disappoints. It’s the kind of recipe that gets passed around at family gatherings — no frills, just good old-fashioned chocolatey joy.
Try other recipes: