Brownies are one of those desserts I never get tired of baking (or eating). Whether it’s for a birthday, a casual Sunday dinner, or just because the day calls for chocolate, this recipe is my reliable, no-fail favorite.
These are the kind of brownies that get requests. Friends ask for the recipe. Family members hover around the kitchen waiting for them to cool. And me? I can’t resist sneaking a corner piece while they’re still warm.
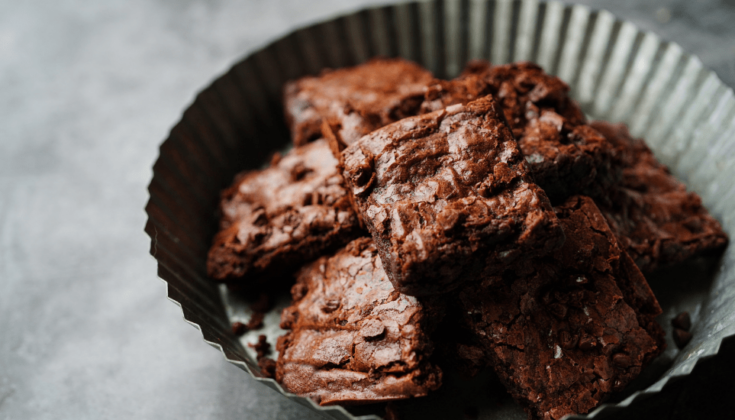
They’re deeply chocolatey, with the shiny, crinkly top everyone loves, and a fudgy center that feels almost like eating pure chocolate in cake form.

Why These Brownies Are Always a Hit in My House
Simple Ingredients: Nothing fancy or hard to find. Just butter, cocoa powder, flour, sugar, eggs, and chocolate chips.
Incredible Texture: That perfect mix of crackly on top and soft in the middle. It’s everything you want in a brownie.
Extra Chocolatey: The chocolate chips melt into gooey pockets that make every bite better.
Easy Method: No stand mixer needed. Just a couple of bowls and a whisk.
Reliable Every Time: I’ve made these so many times, I can do it with my eyes closed. They never fail to impress.
My Brownie Ingredients Breakdown
When I say these are pantry-friendly, I mean it. Here’s what usually goes into my mixing bowl:
Flour: I stick with all-purpose. Nothing fancy. Gives structure without drying them out.
Unsweetened Cocoa Powder: I use natural cocoa most of the time, but Dutch-process works too if I want them darker and richer.
Granulated Sugar: White sugar is non-negotiable here. Brown sugar changes the texture and adds an unwanted molasses note.
Baking Powder: A bit of lift so they don’t turn into a solid fudge block. Keeps them balanced between cakey and fudgy.
Salt: Never skip it. A little salt sharpens all that chocolate flavor.
Butter: Melted, so it blends easily. I prefer unsalted so I can control the salt level myself.
Oil: The secret to staying moist even after a couple of days. I’ll use canola, vegetable, or even mild olive oil in a pinch.
Eggs: 2 whole eggs plus an extra yolk for richness without making them too cakey.
Chocolate Chips: The real star. I’m generous with them—sometimes milk chocolate, sometimes dark, sometimes a mix.

How I Make These in My Kitchen
This recipe is like muscle memory for me. Here’s my typical routine:
1. Melt Butter with Sugar: This is where the magic starts for that crackly top. I warm the butter with some sugar until it’s glossy and melted. Careful not to boil it—just melt and stir.
2. Whisk the Eggs Really Well: I get out a big bowl and whisk the eggs and yolk until they’re pale and thick. This step helps that shiny top form.
3. Combine Hot and Cold Carefully: Slowly, slowly, I drizzle the warm butter mixture into the eggs while whisking like crazy. It keeps the eggs from scrambling while bringing everything together beautifully.
4. Add the Dry Ingredients: Flour, cocoa, baking powder, salt—all sifted or whisked together. I fold this in gently, just until combined. Overmixing is the enemy of tender brownies.
5. Add Chocolate Chips: I stir them in last so they don’t melt too early.
6. Pour into a Prepared Pan: I always line my metal 9×9 pan with parchment. Easy lift-out, no sticking, and clean edges.
7. Bake Just Right: Into the oven until the edges are set but the center still has a little jiggle. That’s the sweet spot.
8. Cool Before Slicing: The hardest part. Letting them cool helps them firm up and gives the cleanest slices. But if I’m honest, there are days when I cut them warm and enjoy the molten center.
How I Get That Shiny Crackly Top
This is the part that people always ask about.
Melt the Butter with Sugar: This step is critical. The dissolved sugar creates that glossy, crackly finish when baked.
Whisk Eggs Well: Incorporating air helps the top rise and crack perfectly.
Combine Slowly: Pouring the warm butter mixture into the eggs bit by bit avoids scrambling and creates a silky batter.
Don’t Overmix the Dry Ingredients: Less is more here. I fold until just combined.
Use Quality Chocolate: Good cocoa and real chocolate chips help with texture and shine.

My Favorite Pan to Use
I always reach for my metal 9×9-inch baking pan.
Why Metal? It heats evenly and gives those crisp edges while the center stays fudgy.
Lined with Parchment: Makes removing and cutting a breeze.
Glass or Ceramic: They work, but they bake slower and can overcook the edges while the middle stays raw. If you use them, add extra bake time and keep an eye on things.
Doubling the Recipe? I use a 9×13-inch pan and watch the time—it usually needs a few more minutes in the oven.
Baking Tips
Oil and Butter: The combo keeps them both moist and flavorful. Butter for taste, oil for that perfect texture.
Don’t Overmix: I stop as soon as the last streak of flour disappears. Overmixing means tough brownies.
Avoid Overbaking: I take them out when there’s still a little wobble in the center. They keep cooking as they cool.
Cooling is Key: I let them cool in the pan on a rack before slicing. For warm brownies, I just microwave them for a few seconds before serving.
How I Store or Freeze Brownies
Room Temperature: Airtight container for up to 3 days. They stay moist and delicious.
Refrigerator: Up to 5 days if I want them to last longer. I let them come to room temperature before serving.
Freezer: I wrap them tightly in plastic wrap, then put them in a freezer bag. They’re good for up to 2 months. Perfect for future chocolate emergencies.
Fudge Brownies
Fudge brownies - Made with the perfect balance of chocolatey decadence and a touch of chewiness, these brownies are the ultimate treat for any dessert lover. Pair them with a cold glass of milk or a scoop of vanilla ice cream.
Ingredients
- 10 tbsp (145g) unsalted butter
- 1 ¼ cups (250g) granulated sugar
- 3/4 cup + 2 tbsp (75g) unsweetened cocoa powder
- 2 large cold eggs
- 1/2 cup (65g) all-purpose flour, spooned and leveled
- 1 tsp vanilla extract
- 1/4 tsp fine sea salt
- 2/3 cup (80g) chopped nuts or chocolate chips (optional)
Instructions
- Prep Your Pan: Preheat the oven to 325°F (162°C) and line an 8-inch square pan with parchment, leaving overhangs for easy removal.
- Melt the Butter: In a medium saucepan over medium-low heat, melt the butter completely (but don’t let it brown). Remove from heat.
- Mix the Wet Ingredients: Stir in sugar, cocoa powder, vanilla, and salt. The batter will look gritty—that’s normal! Let it cool slightly for 5–10 minutes.
- Incorporate the Eggs: Add eggs one at a time, stirring vigorously after each addition until the batter becomes smooth and glossy.
- Add the Dry Ingredients: Stir in the flour until the batter thickens and pulls away from the sides (40–50 strokes with a wooden spoon works wonders). Fold in nuts or chocolate chips, if desired.
- Spread and Bake: Spread the thick batter evenly into your prepared pan. Bake for 20–30 minutes until the edges are set, but the center is still slightly underbaked. A toothpick should come out with moist crumbs, not clean.
- Cool Completely: Let the brownies cool in the pan before removing. For clean slices, chill them in the fridge for 1–2 hours, then cut into 16 squares.
Nutrition Information
Yield
16Serving Size
1Amount Per Serving Calories 111Total Fat 9gSaturated Fat 5gTrans Fat 0gUnsaturated Fat 3gCholesterol 42mgSodium 106mgCarbohydrates 6gFiber 0gSugar 2gProtein 2g
TastyFitnessRecipes.com, occasionally offers nutritional information for recipes contained on this site. This information is provided as a courtesy and is an estimate only. This information comes from online calculators. Although tastyfitnessrecipes.com attempts to provide accurate nutritional information, these figures are only estimates.
Final Thoughts
Fudge brownies are the ultimate indulgence, and with these tips, tricks, and variations, you’re well on your way to brownie bliss. Whether you prefer them plain, studded with nuts, or swirled with caramel, there’s no wrong way to enjoy this classic treat. Happy baking!
Try other fudge recipes: